Templates in Renku
Templates come in handy when you want to be able to use the same kind of high level project structure, dependencies, and/or scripts layouts over and over. The two main aspects of the project that can be templated are:
the directory structure & files
the Docker image that builds your environment
When you create a project on the RenkuLab platform, you can choose between a few templates. You should see at least a Python setup (Basic Python Project) and a R setup (Basic R Project). In many cases, you can use these templates as-is (see the Directory Structure below). If you prefer another language, you require a different IDE, or the base templates don’t meet your needs for any other reason, you can create new ones!
Note that you can create projects that are specifically intended to be templates that others can use by adding to the base Renku template. If you’re familiar with Cookiecutter, you can also create a cookiecutter template as a Renku project.
Directory Structure
The default provided directory structure is the following.
data and notebooks
The data and notebooks directories are where you should keep your…
data (added via renku dataset) and notebooks (by double-clicking on a
python3 or R kernel image from the JupyterLab instance while you’re inside
the dir), respectively.
You can add further nesting of directories under these locations to keep your
project organized.
Moreover, you will probably want to create other top-level directories,
like src for keeping scripts that you create from your notebooks when
your analysis stabilizes, and docs if you wish to keep your documentation
separate from the analysis.
The .gitkeep files in these directories by default are a convention used to
git commit “empty” directories (where normal git behavior is to omit empty
directories).
environment.yml and requirements.txt
These two files are where you write in your conda (environment.yml) and pip
(requirements.txt) library dependencies. This is so that when you kill a
notebook or anyone forks your project, (re)starting a session will pre-install your libraries.
To make it easy to remember to write your dependencies to this file, instead of
pip install <library> in a terminal, for instance, you can get into the
habit of running pip install -r requirements.txt.
.gitignore
This is your typical .gitignore file that you use for git projects. Write into here any files that you don’t want to be tracked.
.gitlab-ci.yml
This yml file is for “continuous integration” in GitLab. It is configured so
that every time you make a commit, your project’s docker image is rebuilt. In
most cases, this build should be successful. If, however, you are making
modifications to the Dockerfile, you should pay attention to the CI/CD tab
in GitLab to check for failing builds. Take a look
at Customizing sessions.
Dockerfile
When you run the notebook server, a Docker image is built for your project as
defined by this Dockerfile. The FROM line in this Dockerfile defines
which Renku Docker image sets up the base of your project; this includes
dependencies for the Renku CLI, JupyterLab, and maybe R kernels & RStudio,
depending on which template you selected upon project creation.
The lines following FROM define the installation of your own software
dependencies; they are the instructions for conda/pip installations of the
libraries in your requirements.txt file. If there’s nothing special
about the libraries you’re installing, you wont have to make changes to this
file. Else, check out Add Packages to your Renku Project Environment.
.dockerignore
The .dockerignore file is just like a .gitignore file, in that it allows
you to specify which files to ignore in a docker build. If you are not making
changes to the docker build, you can .dockerignore this file.
README.md
The README.md file is shown on a project’s home page. It’s good to have at
least the name of the project and a brief overview of the project for your
intended audience.
.renku
The .renku directory includes a renku.ini file which contains
project-level configuration for renku, stored using the
INI format. It can be used
to store project setting such as the threshold
for LFS files, or session specific settings (see next section).
Sessions
If your project has specific resources requirements to run, or if it should default to RStudio or anything other than JupyterLab, then you will want to provide a configuration for the sessions.
You can modify the project setting both on the RenkuLab platform or using the command line as described on the Renku project configurations page.
Here is the list of properties that can be customized in a standard Renkulab deployment:
default_url [string]: URL to use when starting a new session (/lab,/tree, …)cpu_request [float]: CPUs quota (0.5,1, …)disk_request [string]: disk storage quota (1G,4G, …)mem_request [string]: memory quota (1G,2G, …)gpu_request [int]: GPU quota (0,1, …)lfs_auto_fetch [bool]: whether to automatically fetch lfs files or not (true,false)image [string]: optional pinned Docker image (registry.renkulab.io/namespace/my-project:a1b2c3d)
Note
We use JupyterLab as the default web interface for sessions.
If you work in R, you may prefer to have RStudio. This can be
achieved by using /rstudio as the default_url instead of /lab.
> renku config set interactive.default_url "/rstudio"
Verify that your renku.ini file looks like the following.
[renku "interactive"]
default_url = /rstudio
After running this command locally or in a session, you need to git push,
wait for a new Docker image to be available, and
start a new session to have RStudio as the default
web interface.
This is necessary since the config command creates a new commit.
Note
Using the same approach as above for RStudio, it is possible to switch the
interface from JupyterLab to the classic Jupyter Notebook by using /tree
as the default_url instead of /lab.
> renku config set interactive.default_url "/tree"
Pin a Docker image
Every new commit triggers a Docker image creation once pushed back to RenkuLab. This process uses the GitLab CI/CD pipelines as described above on the .gitlab-ci.yml file section. The creation process may be time-consuming, especially for images having many dependencies.
Unless you modify the Dockerfile or add dependencies, building a new image
may not be necessary. It is possible to pin a Docker image to skip this step
and even remove the image_build job from the .gitlab-ci.yml file.
Beware that this is risky since users won’t be able to include further changes
to the Docker file or adding dependencies. Still, it’s very
useful in many situations, especially when you expect many users to fork your
project in a short time span (all forks trigger the creation of a new Docker
image).
A typical case would be a presentation or a lecture where you plan to set up a
project ready to be forked and used.
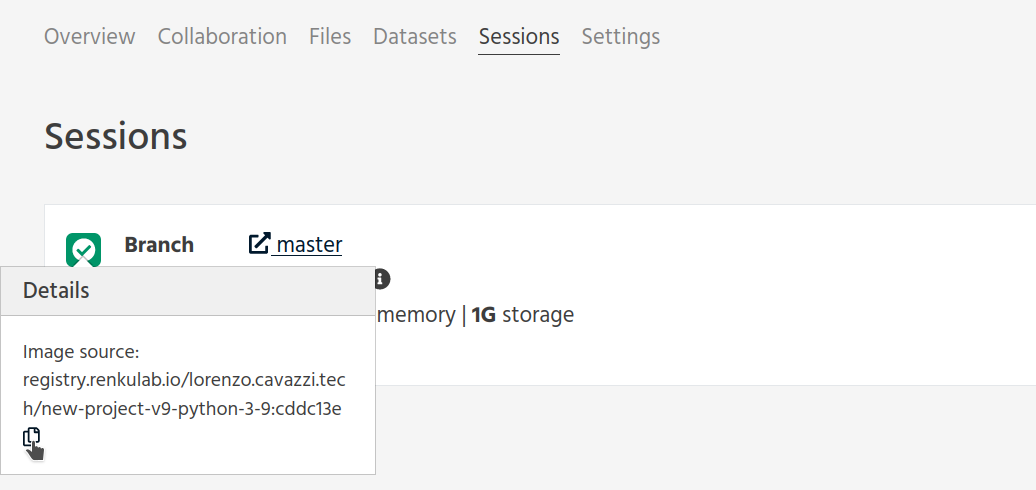
Through the Renku project configurations, you can pin any image coming from a local or remote Docker registry v2. The easiest way would be using an image built on RenkuLab. Once you settle on one, either in the project you are setting up or in another one you keep pristine, you can start a session to verify all works as expected. When the session is running, you can check the image URL on the sessions list by clicking on the green icon.
Copy the link, and paste it in the Docker image field in the advanced setting
section of the project sessions settings, or using
renku config set interactive.image <URL_to_image>.
Note
The user experience for launching a new session won’t change much when there is a pinned image. However, the impact of a missing image will be broader since it may impact multiple commits and forked projects. You should ensure your image works properly.
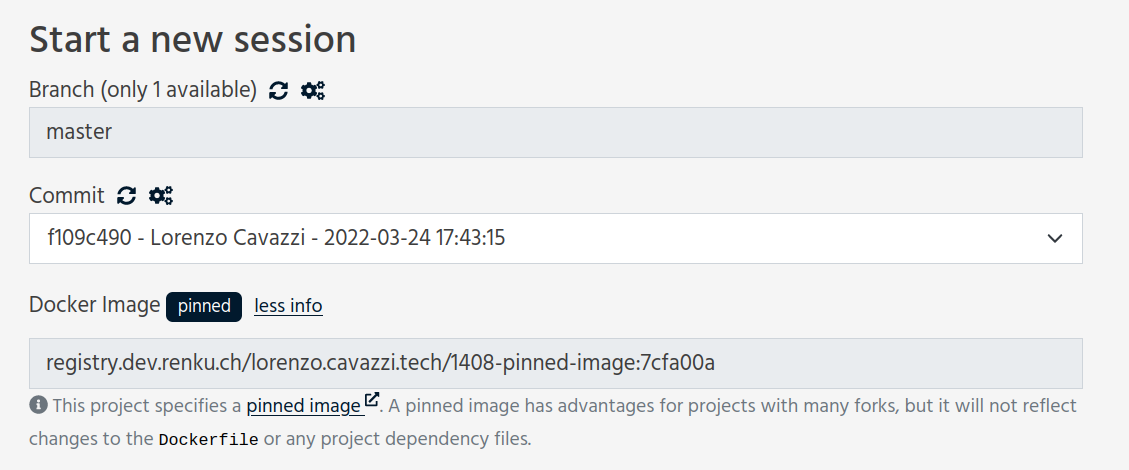
You can verify it by launching a new session. After expanding the advanced
settings, you should see a blue label next to Docker image saying pinned.
Mind that a red label means the image is not accessible. Click on more info
to verify the URL is the correct one.
What can I touch? What should I not touch?
What you should or should not touch depends on how well aligned your project is with the defaults that Renku provides. Here are two example use cases:
User #1: Default everything
You’re a python developer and you’re ok with JupyterLab and the version of python provided by the base template. You install all of your libraries with pip or conda. While you work on this project, you can feel comfortable modifying the following (as well as creating your own directories and subdirectories to match your project’s structure):
dataandnotebooksdirectories.gitignorerequirements.txt(pip) andenvironment.yml(conda)README.md
User #2: Extra dependencies
You want a different version of python than the one provided, you want to install software that requires additional non-python/R dependencies, or you want to make other changes, and you’re comfortable editing Dockerfiles. In addition to the files above, you might modify the following. Consult Customizing sessions.
Dockerfile.dockerignore.gitlab-ci.yml
Warning
Modifying these files can result in an image that does not build. Resetting to default values and killing and restarting the notebook should bring you back to a working state.
You can add any extra directories, sub-directories, and files anywhere without a problem, but you probably want to leave the dotfiles in the level that they’re in in the default templates. Some of the integrated tools expect to find these files in the top level of the project and will fail otherwise.
What else could be templated?
Here are some other aspects of a project that could make use of a template:
documentation
subdirectories for keeping different parts of a project (note that you’ll want to add
.gitkeepfiles into empty directories to be able to git commit them)python scripts with
argparseset up for inputs and outputsDockerfilewith installation of alternate IDE
One way to write templates for these aspects of the project is to create them with Cookiecutter. Cookiecutter is a CLI that creates projects from project templates. You can define your own templates, or check out some of the curated cookiecutters. Note that some of these clash with the renku templates (i.e. content in Dockerfile, .gitignore, etc.). As long as you read the docs above to understand which parts are required for renku, you should be able to merge these manually.
Create a template repository
We maintain an official Renku template repository that provides a few basic templates you can use to initiate your projects. That should cover the most common use cases, but we assume users want to create their own templates to speed up the bootstrap phase of a new project.
The easiest way to create your own templates is to clone our Renku template repository and modify it as you need.
You can validate that everything is ok with your custom template repository
by running renku template validate in the repository root, which will
point out any potential issues with the templates.
manifest.yaml
The
manifest file
contains all the specifications needed by the renku init function to
create a new project. You can specify multiple templates in the same
repository. Each of them requires an entry with the following parameters:
id: the target directory inside the repository where the template files are stored. You must use a different id/directory for each template. Note that this field was calledfolderpreviously which is deprecated now. You can still usefolderbut when validating your templates, you’ll get a warning to replace it withid.name: a short user-friendly name.description: a brief description of your template. This will be presented to the user when choosing between templates.ssh_supported:trueorfalse, indicating whether the template supports SSH connections. To support SSH, the Dockerfile has to use one of the Renku base images with version 0.14.0 or higher, or have a functioning SSH server running inside the image listening on port 2022 and reading client keys from$HOME/.ssh/authorized_keys.aliases: A list of ID aliases for the template. This is useful if you want to rename a template or move it to a different directory. See renaming templates for more information.variables: we support the Jinja template engine in both file content and filenames. You can therefore ask users for specific values for any number of variables. The syntax is<variable_name>: <variable_specification>, where the name will be used as the variable name provided to the engine andvariable_specificationis a dictionary defining the variable. A variables entry looks likevariables: name: description: description of the variable type: string bool_var: description: description of the variable type: boolean default_value: True enum_var: description: description of the variable type: enum enum: - "yes" - "no" - maybe - ask again default_value: ask again number_var: description: description of the variable type: number
where specifying a
descriptionis mandatory.default_valuedetermines the value that is used if a user doesn’t provide a value.typedetermines the type of value that this variable expects, which can be one ofstring,boolean,numberorenum.booleanaccepts most truthy/falsy values, such astrue,false,0,1,"0","1","True","False".numberaccepts numeric inputs like integers and floats.enumis a special type that restricts the accepted values to those set in theenum:list of values.allow_template_update: This field is deprecated and will be ignored. It was used to indicates that the template supports being updated. All templates are updatable now. When the template gets updated, projects created from it will get updated with the new template files. Defaults tofalse. Also seeimmutable_template_files.immutable_template_files: A list of file paths inside the template (relative to the project root) that should not be changed by users. Users changing any of these files will get a warning when trying to commit those changes if Renku CLI pre-commit hook is installed in a project. Template files not in this list won’t get updated on template update if they were modified by a user. If a user does change one of these files, automated template update is no longer supported on that project, to prevent broken/inconsistent projects.icon: A relative path to an image file inside the repository that is associated with the template. This icon is presented to users in the UI on the template selection screen. Valid formats are PNG, JPEG and BMP. Icons are limited to a resolution of 256x256, if the icon you provided is larger than this, it will be scaled down.
In addition to the custom variables mentioned above, we also provide some renku-specific variables that are always available in templates, namely:
name: The name of the project.__template_source__: The git repository the template originated from orrenkuif the template was distributed as a part ofrenku-python.__template_ref__: The branch/tag of the template repository.__template_id__: The id of the template inside the repository.__repository__: The repository where the project resides in (only set when creating a project online in renkulab).__namespace__: The project namespace (only set when creating a project online in renkulab).__sanitized_project_name__: Sanitized name of the project (without special characters) as used in Gitlab and URLs.__project_slug__: The project slug (<namespace>/<sanitized project name>) (only set when creating a project online in renkulab).__renku_version__: Renku version to be used for the project.
Use custom template repositories
If you installed the renku command-line interface locally, you can specify a
template repository as an argument to the renku init command. If you do
this, we recommend that you also specify a tag (or a commit) when creating
a new project from a custom repository to ensure that the action is reproducible.
You can find further details in renku init docs.
If you are using a RenkuLab instance, you can use a custom template repository by
changing the Template source to Custom on the project creation page. There,
you will be able to insert a URL pointing to your template repository.
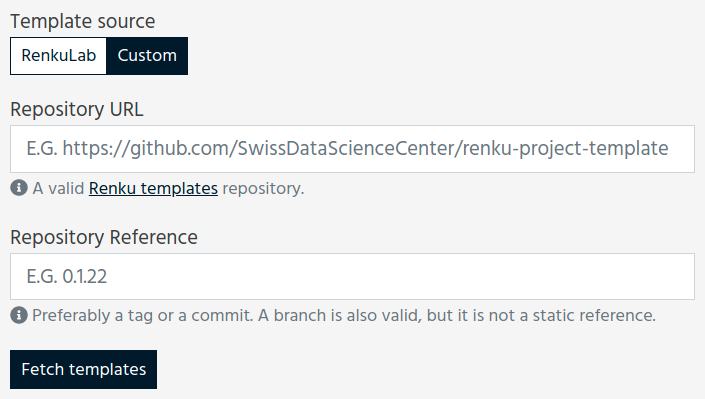
Fill in the reference and click on Fetch templates. This will parse and validate the repository, showing the list of available templates.
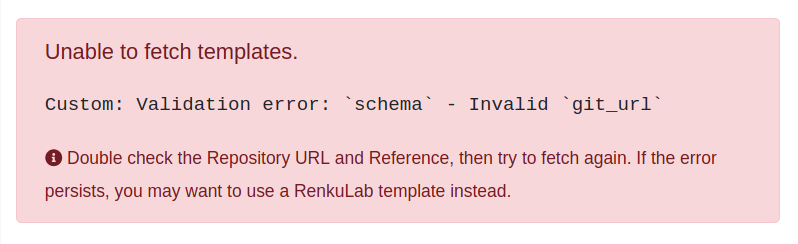
An error may occur while fetching the templates for many reasons. Most of the time, the template repository is invalid (in that case, double-check the manifest file), or the URL/reference combination is wrong. The UI should show a meaningful error description.
Note
Remember to provide the URL to the git repository. For GitHub and
other code management systems, you can provide the link used to clone
through https, ending with .git. You can usually leave the
.git extension out, but pay particular attention when you try to
copy-paste directly from your browser. Even an additional final slash can
lead to an invalid URL, and the error may be confusing.
This is what you get if you use
https://github.com/SwissDataScienceCenter/renku-project-template/ instead
of https://github.com/SwissDataScienceCenter/renku-project-template:
If you think your template may be useful for the broader community, you can have more visibility by including it in the community-contributed project templates repository. Feel free to open a pull request and we will validate it.
If you are working in a dedicated RenkuLab deployment and your local community needs the templates, you should contact the administrators to include your repository in the RenkuLab template source through the renku-values file.
Renaming templates
If you are the owner of a template repository, you can change the name of the
templates. To do this, edit the manifest.yaml file and put the new name
in the id (used instead of folder that is deprecated) field of the template you want to rename. You then
need to add the old name to the aliases field so that projects created
from the old name can be updated to use newer template versions. In addition,
template’s directory must be renamed to match the new id.
The following example shows contents of manifest.yaml files to rename the
basic template to advanced:
- id: basic
  name: Basic Template
  description: Basic template for Renku projects
manifest.yaml after renaming:
- id: advanced
  name: Advanced Template
  description: Advanced template for Renku projects
  aliases:
    - basic
Create shareable project-creation links with pre-filled fields
There are times where you may have many users that each need to create their own repository, but some of the parameters are shared across all the repositories. An example could be in a course where each student needs their own repository, but all should use the same template and metadata.
For this case, it is possible to generate a project-creation link containing metadata embedded in a query parameter. When that link is entered in a web browser, the UI will automatically fetch the required information and pre-fill the fields.
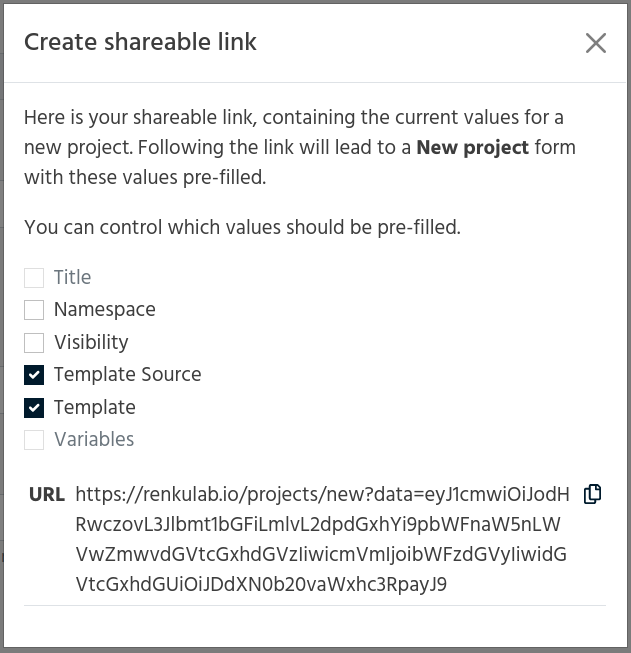
To create a shareable link, start by filling in all the fields as you would do when creating a new project. Instead of clicking on Create project, click on the dropdown on the right side of the same button and then on Create link.
You should see a modal dialog where you can select which fields to include in the metadata. Some may not be clickable (no value provided), and others are deselected by default. The URL updates in real-time and can be copied to share with others.
Note
You can include any of the listed fields in the link, but you should be
careful when including namespace and visibility. Your user namespace cannot
be available to any other users, and group namespaces may require specific
permission. The visibility is generally tied to the namespace visibility,
although private should always be available since it is the most
restrictive one.
It would be best to prefer fixed references for custom template repositories, especially when selecting a template and providing values for variables. This means commits and tags are a good choice, while branches are not. Otherwise, the template or the variables may change in a later version, resulting in a corrupted link.