Docker and Renku
Renku uses Docker containerized environments. This is how Renku ensures that when you share a Renku project, your project environment is exactly the same. Read on to learn more about Docker, how Docker is used in Renku, and how you can customize your Renku Docker image!
Dockerfile structure
The project’s Dockerfile lives in the top level of the project directory. In
the default Dockerfile provided in the template, the first line is a
RENKU_BASE_IMAGE argument used to feed the following FROM instruction.
It specifies a
versioned base docker image.
We add new versions periodically, but the heart of it is the set of installations
of jupyterlab/rstudio, git, and renku:
ARG RENKU_BASE_IMAGE=renku/renkulab-py:3.7-0.7.3

# or, for RStudio

ARG RENKU_BASE_IMAGE=renku/renkulab-r:4.0.0-0.7.3
The next two statements install user-specified libraries from environment.yml
and requirements.txt:
# install the python dependencies
COPY requirements.txt environment.yml /tmp/
RUN conda env update -q -f /tmp/environment.yml && \
  /opt/conda/bin/pip install -r /tmp/requirements.txt && \
  conda clean -y --all && \
  conda env export -n "root"
Then we specify the renku version to be installed through pipx:
ARG RENKU_VERSION=0.12.1
You can add to this Dockerfile in any way you’d like.
Customize your Dockerfile
Before we get into modifying Dockerfiles, if you want to know how to update the base version of your RenkuLab image, see Upgrade your Renku project.
If you’re going to make simple modifications to the Dockerfile (i.e. changing
the base Docker image version number), you can use the following steps to update
and re-build the image:
On the project’s landing page, click the View in GitLab button in the upper righthand corner (opens a new tab by default).
In GitLab, click the Repository tab in the lefthand column, which drops you into the Files tab.
Click the Dockerfile out of the list of files that appears, and click Edit (top right, near the red Delete button. Don’t click the red Delete button.)
Make your edits in this window.
When you’re satisfied with the edits, scroll down and write a meaningful commit message (you’ll thank yourself later).
Click the green Commit changes button.
You may find the official docker documentation useful during this process.
Now you have committed the changes to your Dockerfile. Since you have made a commit,
the CI/CD pipeline will kick off (pre-configured for you as a renkulab-runner
inside the GitLab CI/CD settings). It will attempt to rebuild your project with
the new contents of your Dockerfile based on the configuration in .gitlab-ci.yml,
a file at the top level of your project directory.
The contents of .gitlab-ci.yml show you that in the build stage, we pull
the docker image for Renku, build our new image out of our Dockerfile
with a tag relating to the commit, and push it.
Let’s monitor this process:
Click the CI/CD > Jobs tab.
Click the latest status that corresponds to the changes to the
Dockerfileyou just made (probably “running”, unless it’s already “completed” or “failed”).
This is the log file from the build process specified in the .gitlab-ci.yml
file. If it succeeds, there will be a green passed status, and the end of
log will be a green Job succeeded. If the build instead failed, you can use
the messages in the log to determine why and hint at what you can do to fix it.
Warning
Note that the settings have been configured for this build to time out and fail
after one hour. While a long running build might be indicative of a bug in your
Dockerfile, it’s possible that your build might take a long time. If this is the
case, you can change the limits in the project settings via the lefthand column of the GitLab
interface at Settings > CI/CD > General pipelines > Timeout.
Using your new Docker image
Passing CI/CD is great, but in order to use the new image you need to start a new session.
To do this, go back to Renku, and from the project’s landing page,
first check in the Files tab that your changes to the Dockerfile are
present. If not, you can force-refresh the page. Then, go to the Session tab.
If you have any running sessions, those will keep running the
image built with the older version(s) of the Dockerfile.
You can click on New session and Start session to start a new one that
includes the latest image.
Note
By default, the New session page detects any running session and you may see the message A session is already running., suggesting you open that one instead.
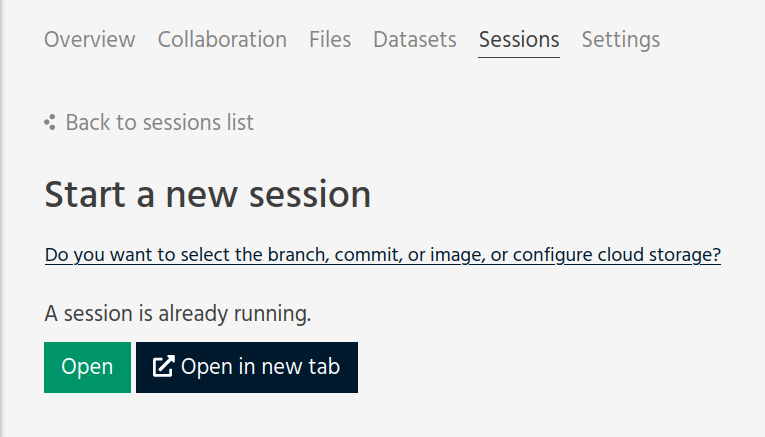
In this case, you can click on Back to sessions list and stop any running ones, or expand the Advanced settings section to select the commit.
Be sure the list of commits has been refreshed and then select the latest one, which should appear as the first in the list. Beware that RenkuLab has an aggressive autosave system to prevent losing any unsaved work. Selecting the latest commit may show a warning if any unsaved work has been detected. If your latest commit already includes all the changes, you can safely ignore it.
If the server launches, test it to make sure that the extra functionality you
added in the Dockerfile is present in the container. If it is not, you can
go back to the GitLab interface and continue to make changes until you are
satisfied.
Looking to make more extensive modifications? Build running too long? Keep on reading through the section below.
More extensive modifications
If you want to make more extensive modifications, say ones that would require longer build times, you may wish to test the docker build on your own machine. You can follow the docker tutorial to get set up and learn how to build and test local images.
Once you have a local docker setup, you can clone your project locally (if you
haven’t set up an SSH key from GitLab you’ll need to do this), make
modifications to the Dockerfile, and docker build and docker run to
test your changes. To test whether your docker image will work, try running it
with:
docker run --rm -ti -p 8888:8888 <image> jupyter lab --ip=0.0.0.0
Warning
You need to install jupyter and jupyterhub into the image to be able to
start notebook servers on renkulab.io.
You can commit these changes and push to the repo. Then, follow the rest of the steps in Customize your Dockerfile.
Note that by default there are two choices for the Dockerfile (chosen at
project creation time via “python base” or “R base”) for the base image, located
here:
a JupyterLab base (with renku installed on top)
a rocker (R + RStudio) base (with conda and renku installed on top)
These two images are available on dockerhub.
If you can’t work with the template Dockerfile provided, you can pull one of
these base Dockerfile s and add the renku, git, and jupyter
parts to another base image that you might have.