External Storage in Renku Sessions
Renku supports accessing data from external storage services like S3, Azure Blob, WebDAV, etc. in interactive sessions. Access to external storage can be configured via project settings.
In the sections below we describe how to add and manage storage configuration to your projects and highlight some current limitations:
Note
Note that this feature is optional; it is enabled at renkulab.io but other Renku deployments might not support it. Contact your administrator for more details.
Warning
We support both Read-only and Read/Write access modes. Please note that explicitly marking an attached storage as Read-only is strongly encouraged every time you don’t have write permissions. This prevents unexpected error messages when trying to access the storage. Furthermore, please be aware that allowing write access to your data could result in data loss, data corruption or data being overwritten. Consult the documentation of your cloud storage provider to learn how to setup access controls and data versioning if you want to protect your data.
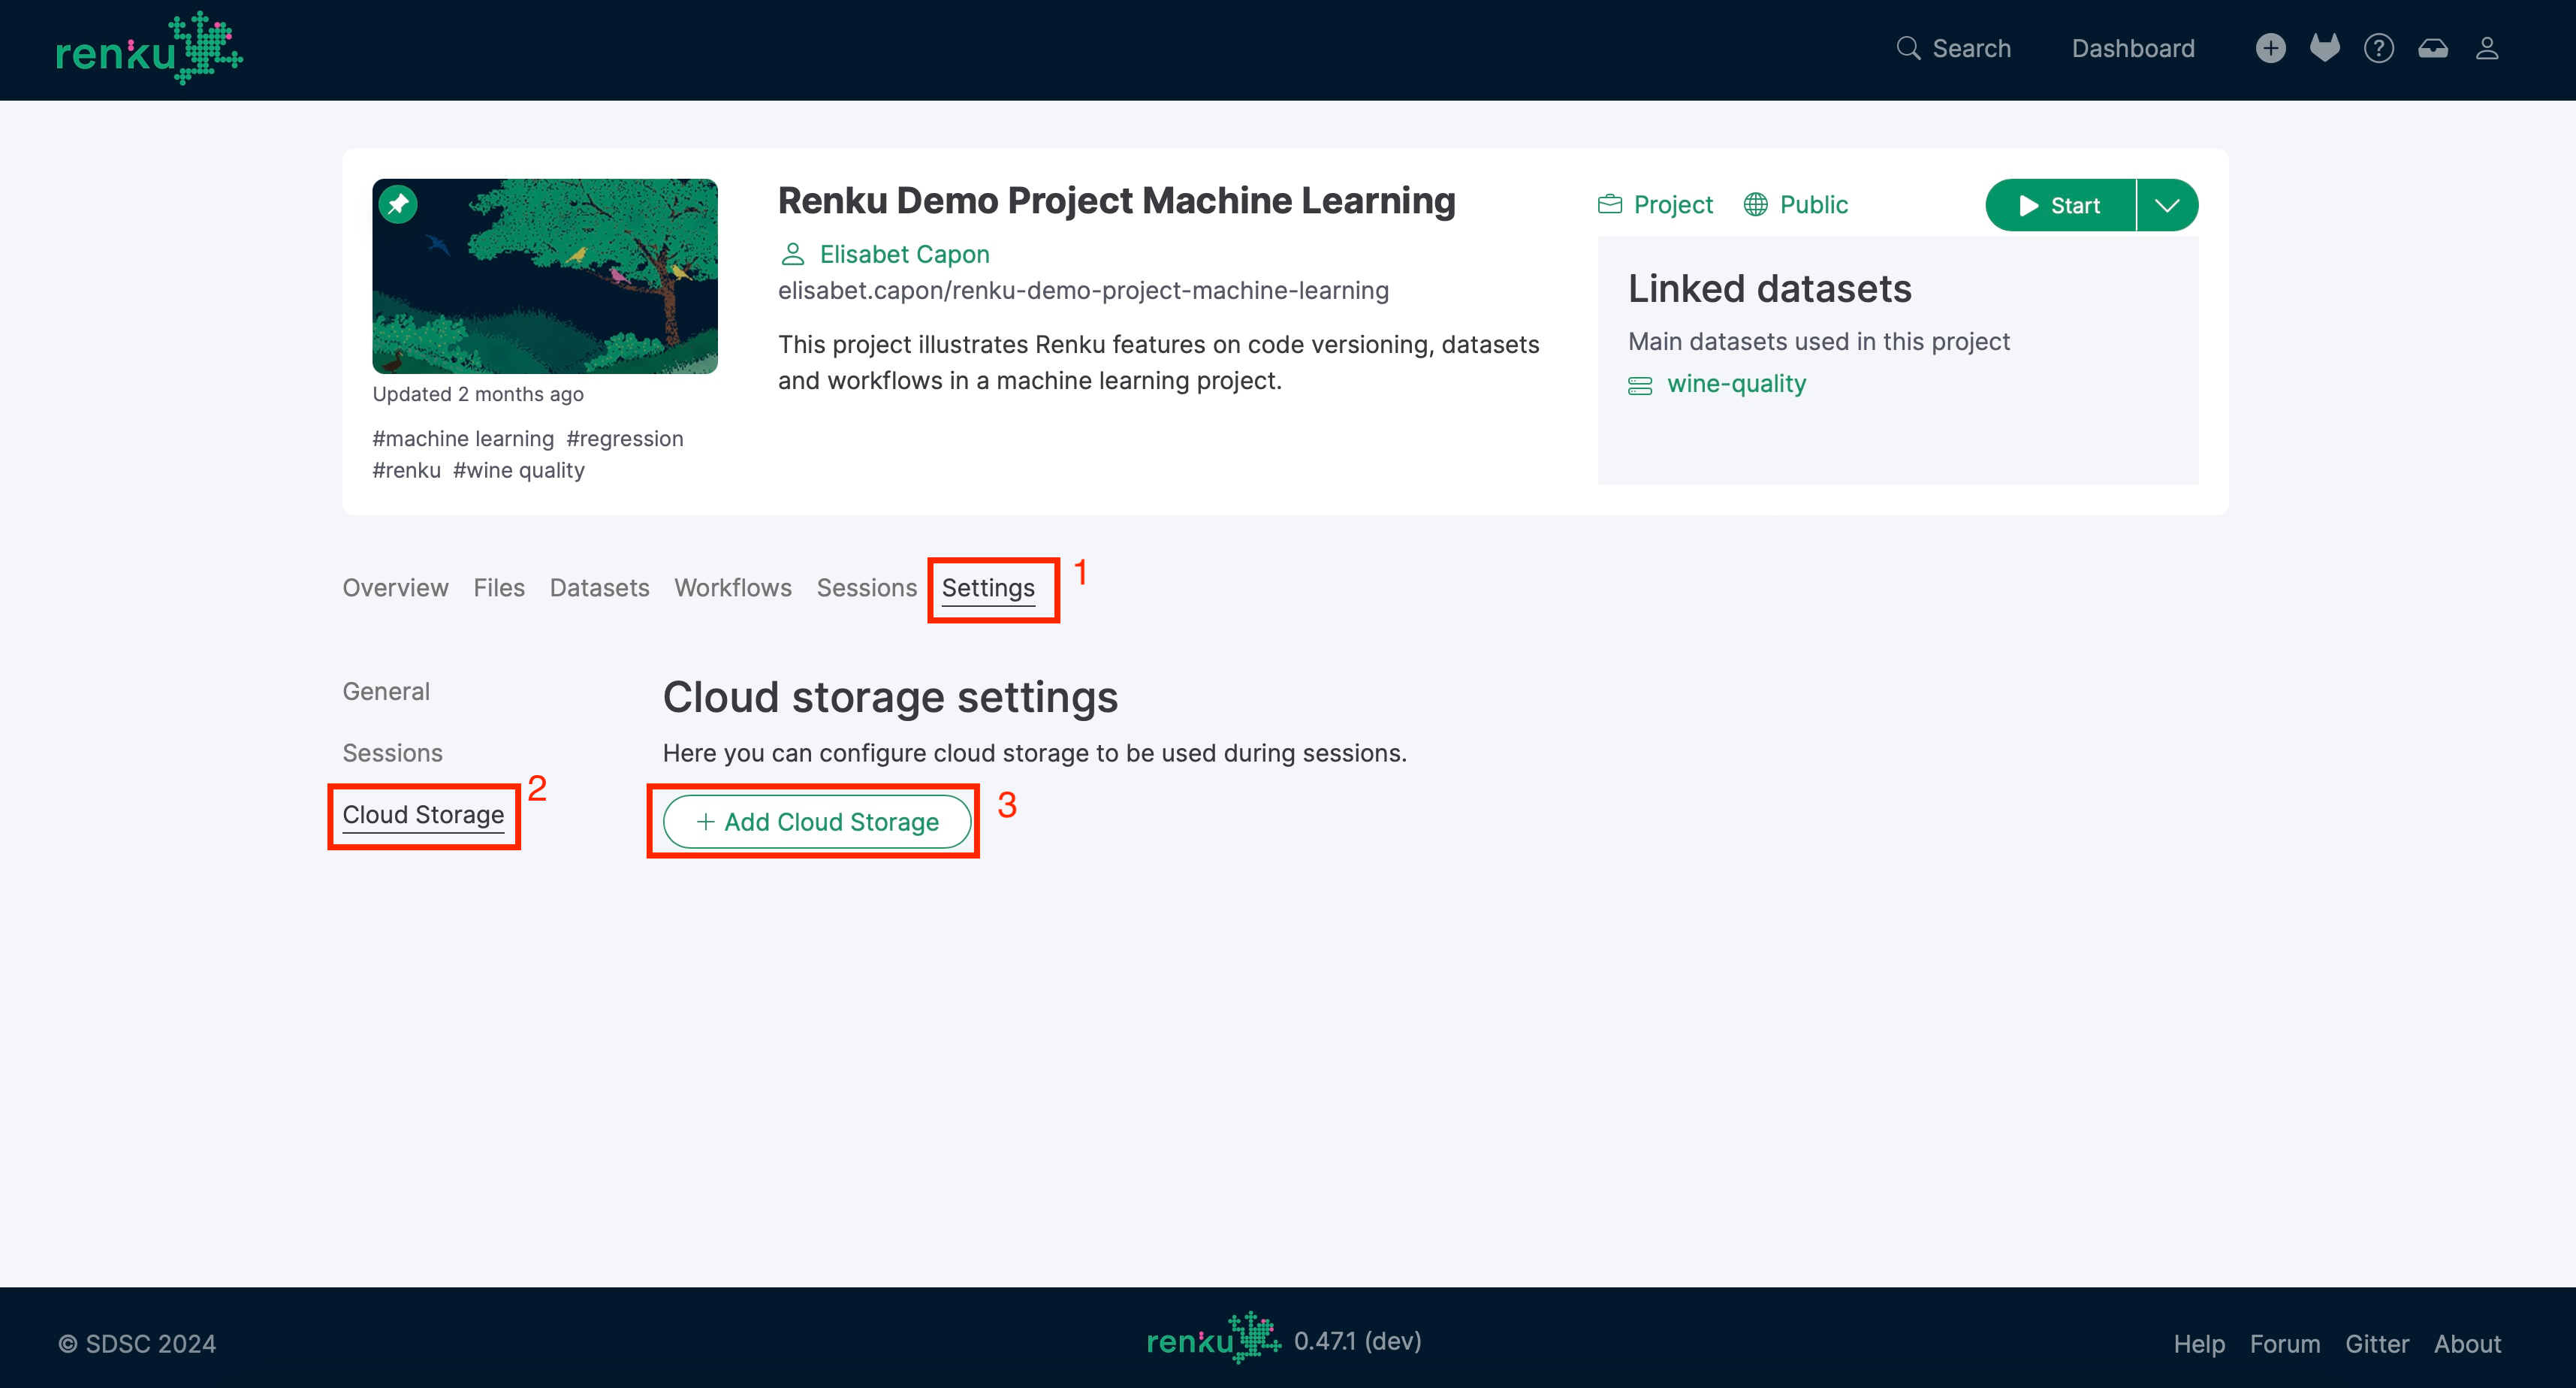
Adding external storage to a project
Currently, we support configuring external storage access per project.
Under the project’s Settings tab, you can find the Cloud Storage
section. From there, you can click on the Add Cloud Storage button and follow the
instructions to go through the guided procedure.
Step-by-step mode
This is the default mode. It will guide you through the process of adding an external storage to use in your sessions.
Depending on the storage service, the list of options might be long, especially when clicking the “Show full list” switch. Most of the time, the basic options are sufficient. For more information, please refer to either the Rclone documentation or the documentation from the storage provider you are using.
Advanced Mode
If you are familiar with Rclone, you can switch to the “Advanced mode” and copy/paste from any Rclone configuration file.
Mind that we require some additional information that cannot be inferred from the configuration file, such as the storage name, the access mode, and the mount point for the sessions.
Specific storage providers
The backend supports a variety of storage providers. It is based on Rclone and we therefore support most of the storage services that Rclone supports, except for anything requiring the OAuth flow or virtual rclone providers. The experience is optimized for the most commonly used services, such as S3 and WebDAV. Please let us know if you require access to another service that is not covered by the currently-available options!
S3
Here is an example of attaching an S3 bucket to your project. We pick the public dataset Genome in a Bottle (GIAB) hosted on AWS and show how to attach it to a Renku interactive session:
Navigate to the
Settings: Cloud storagein one of your Renku projects.Click on the
Add Cloud Storagebutton and selectS3for theStorage Type, then pickAWSon the provider list. Click on theNextbutton at the bottom.
Fill in the form by using
giabas theSource path, andhttp://s3.amazonaws.comas the endpoint. We don’t need any credentials, and the region is optional. Click on the"Nextbutton.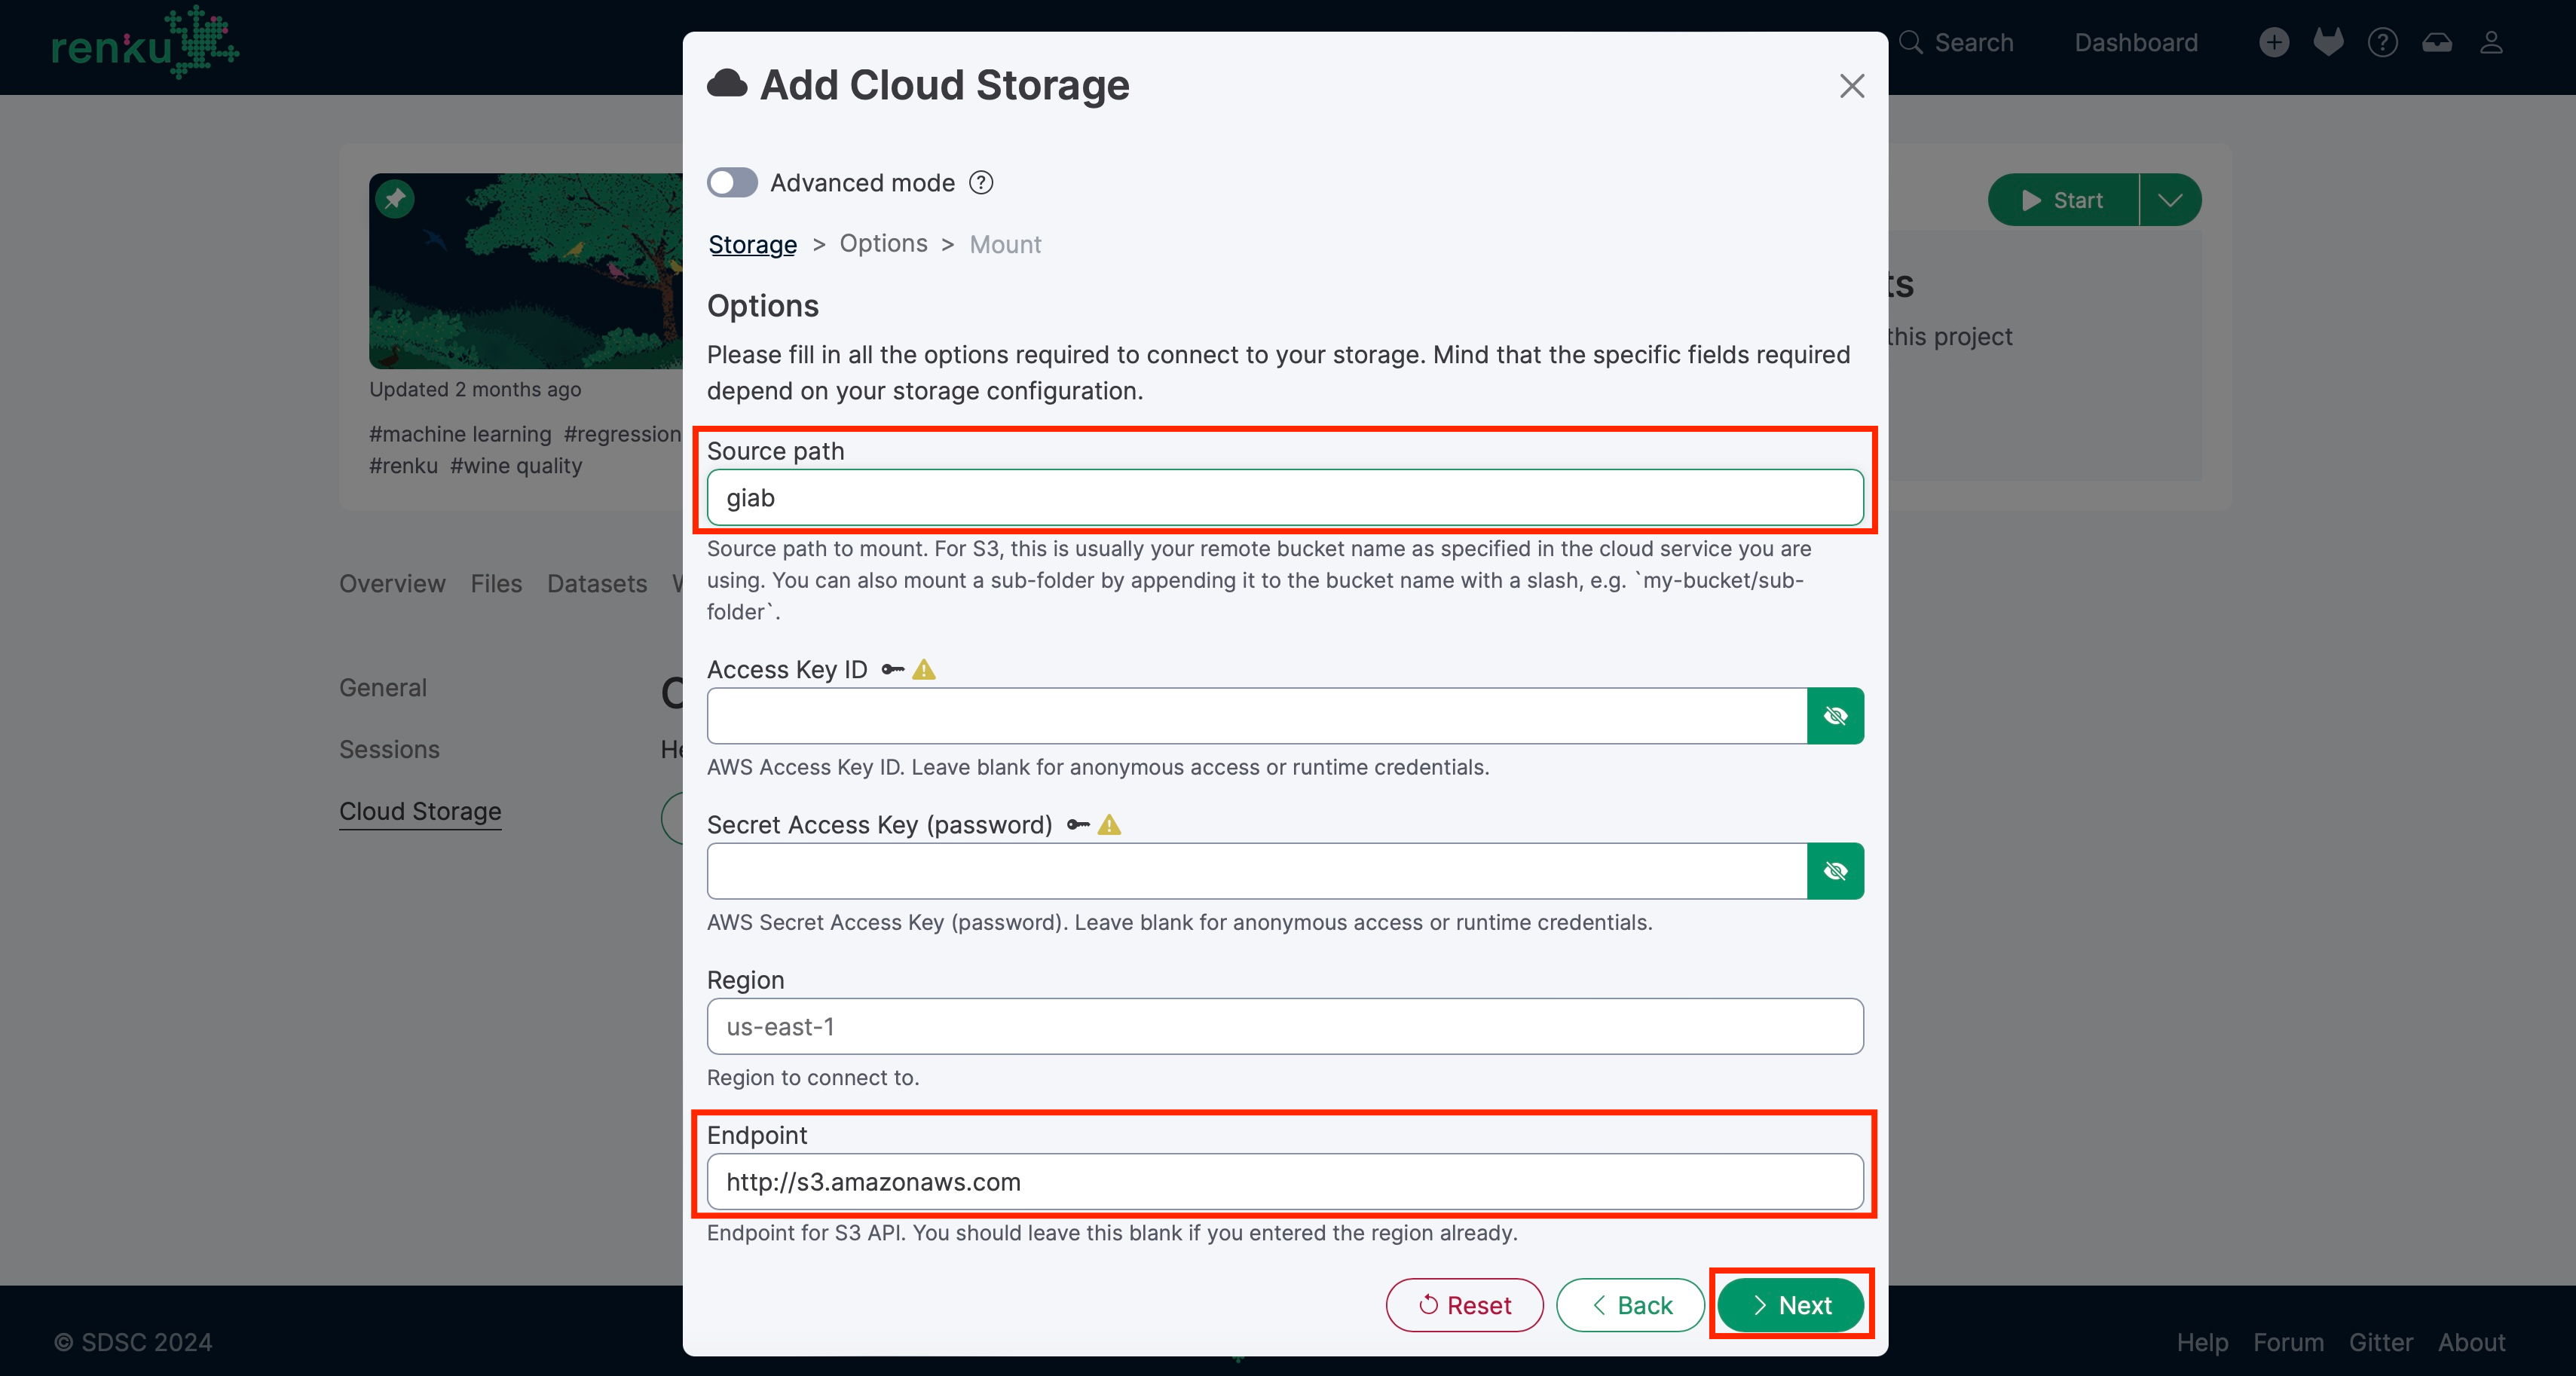
On the last page, pick any name for the storage (e.g.
Giab), then mark this as Read-only. You can change theMount pointtoo; that determines the virtual folder where this is mounted in the running sessions. Click on theAdd storagebutton.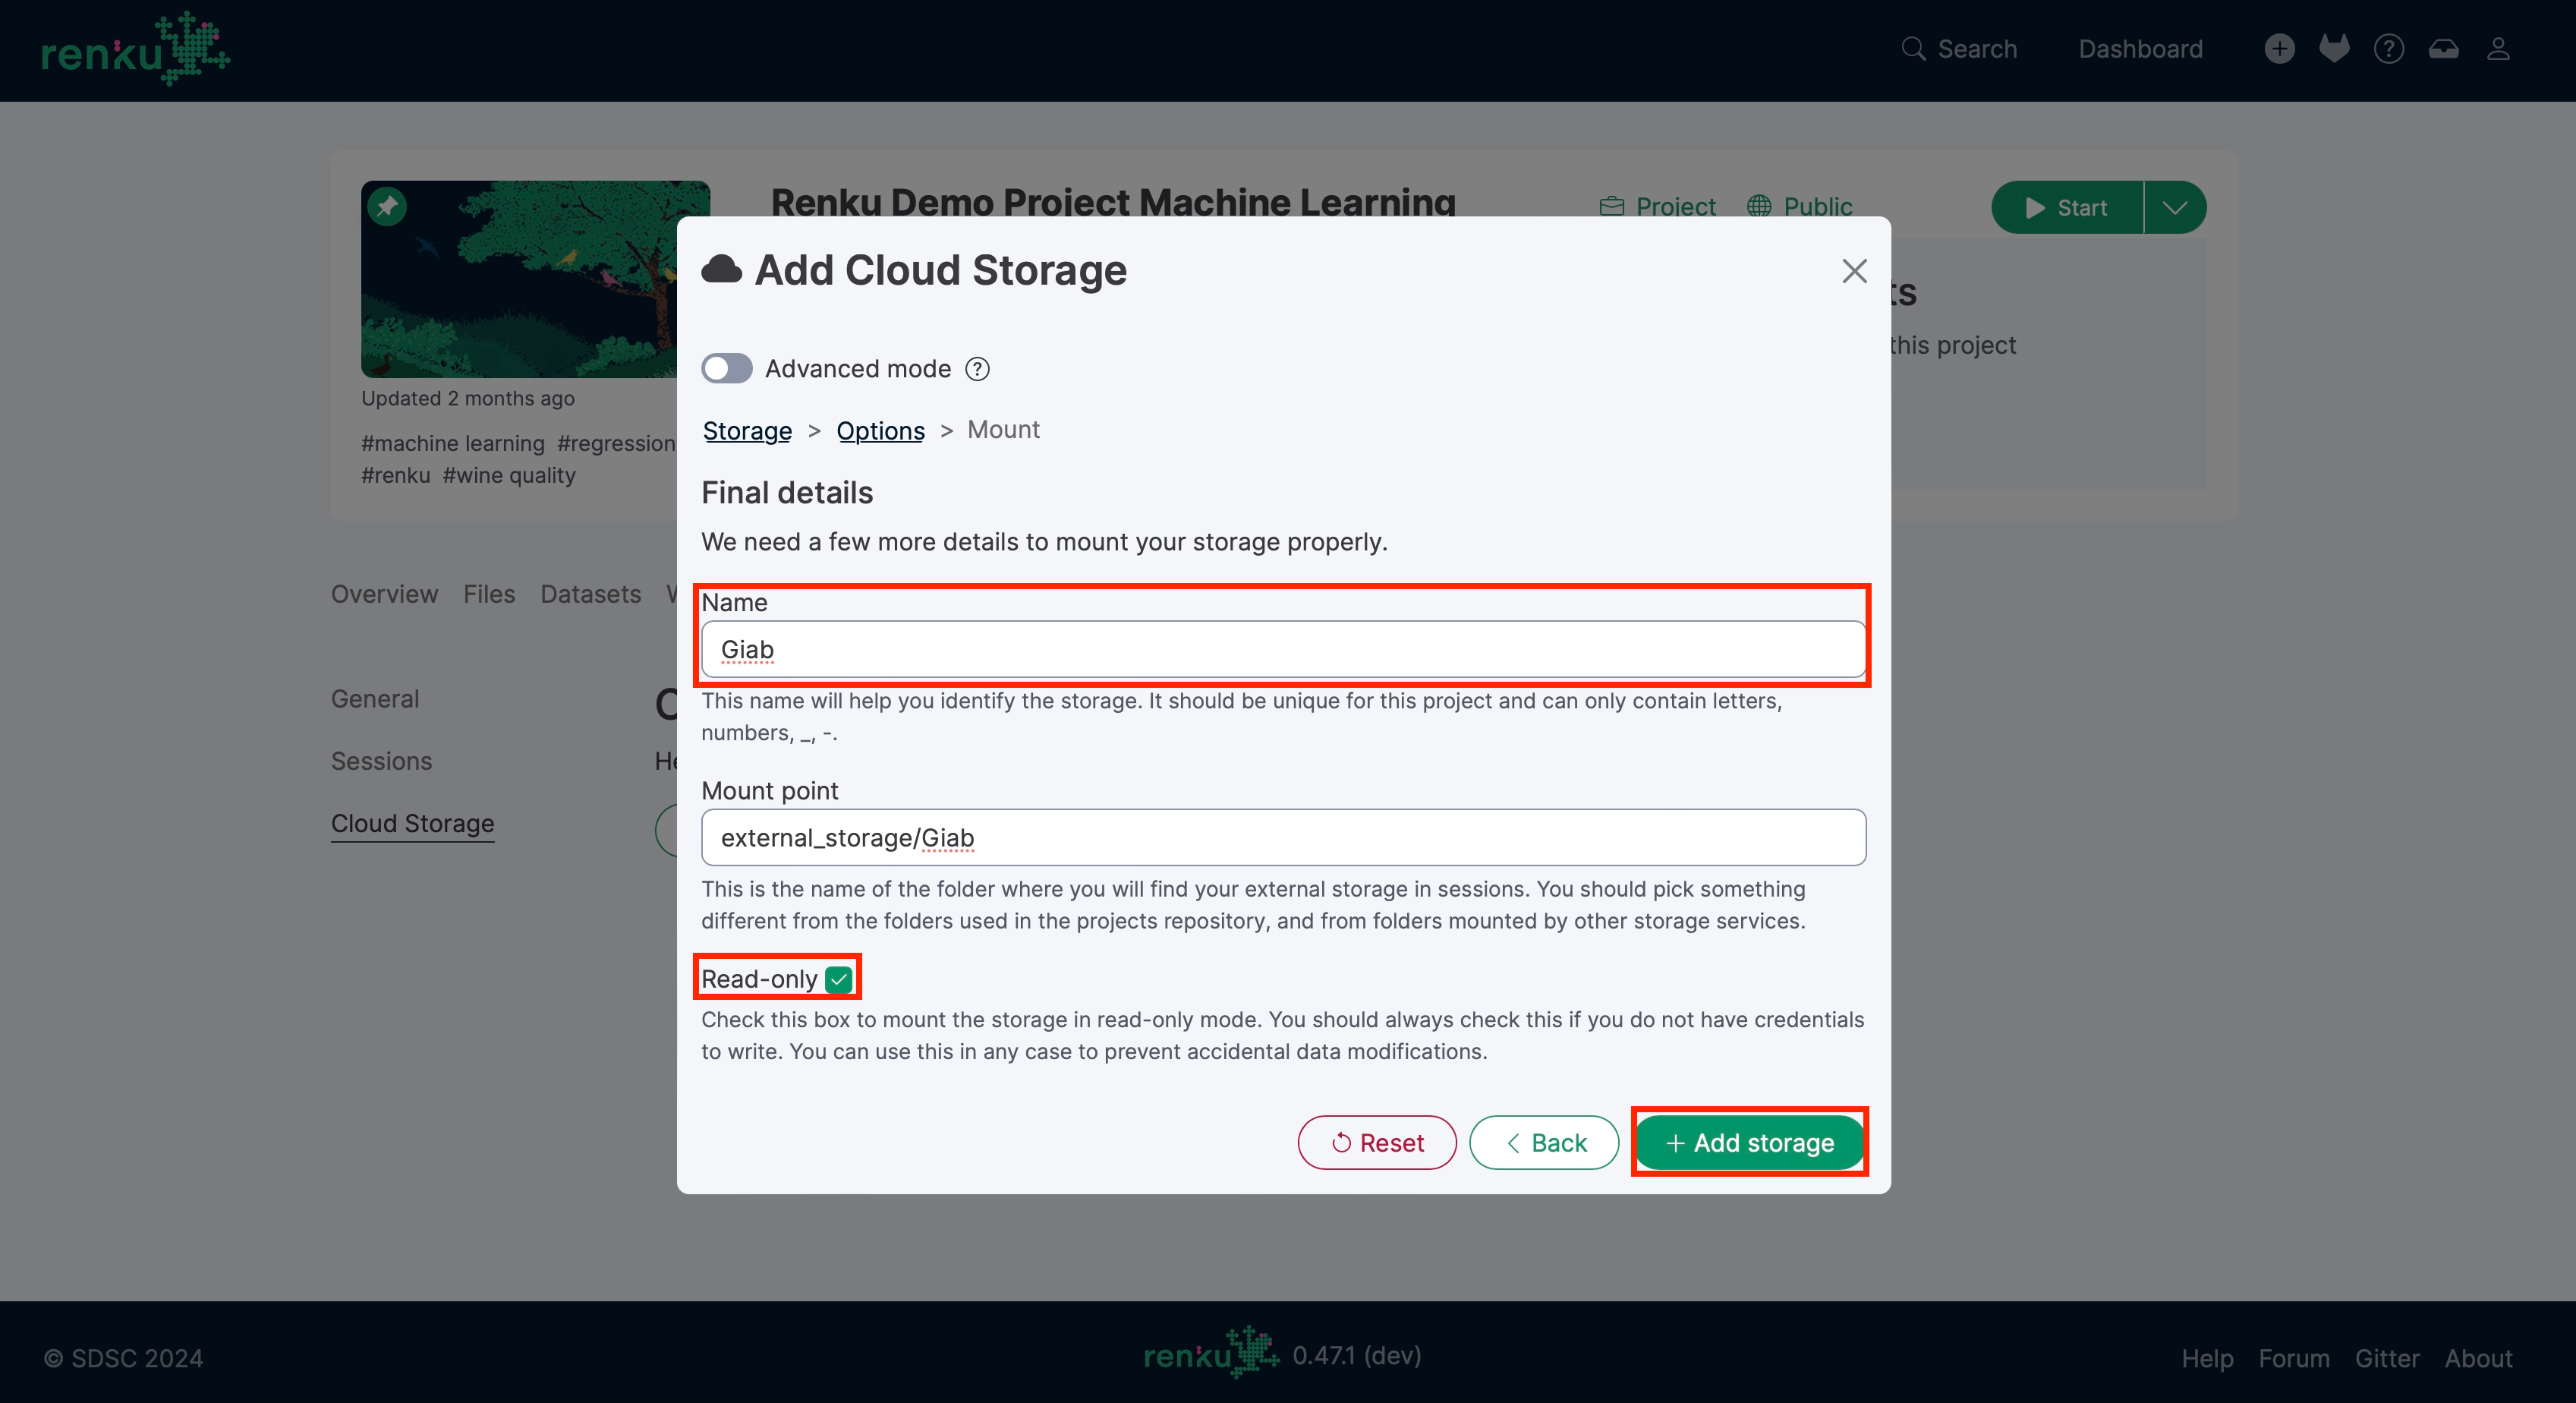
Note
The mount point is relative to the root of the project path in the session.
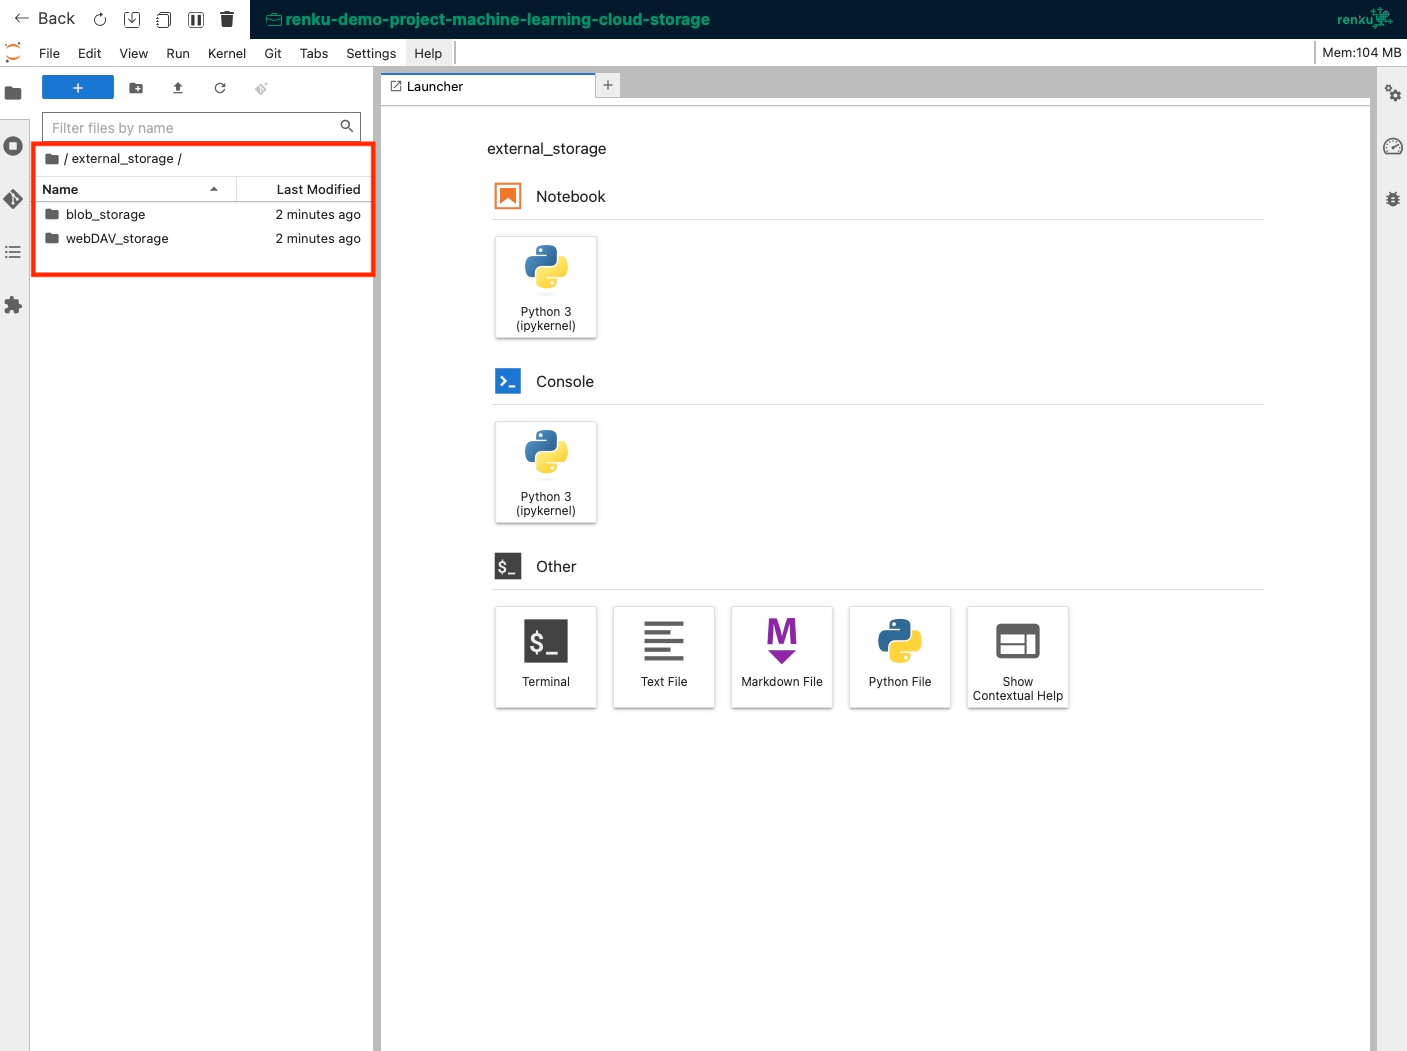
You can now start a new session and access the giab bucket at the external_storage/giab path in your project.
Azure Blob
For this example, we host some data files in the folder test-data
hosted on Azure and show how to attach it to a Renku interactive session:
Navigate to the
Settings - Cloud storagein your project.Click on the
Add Cloud Storagebutton and selectazureblobfor theStorage Type. Click on theNextbutton at the bottom.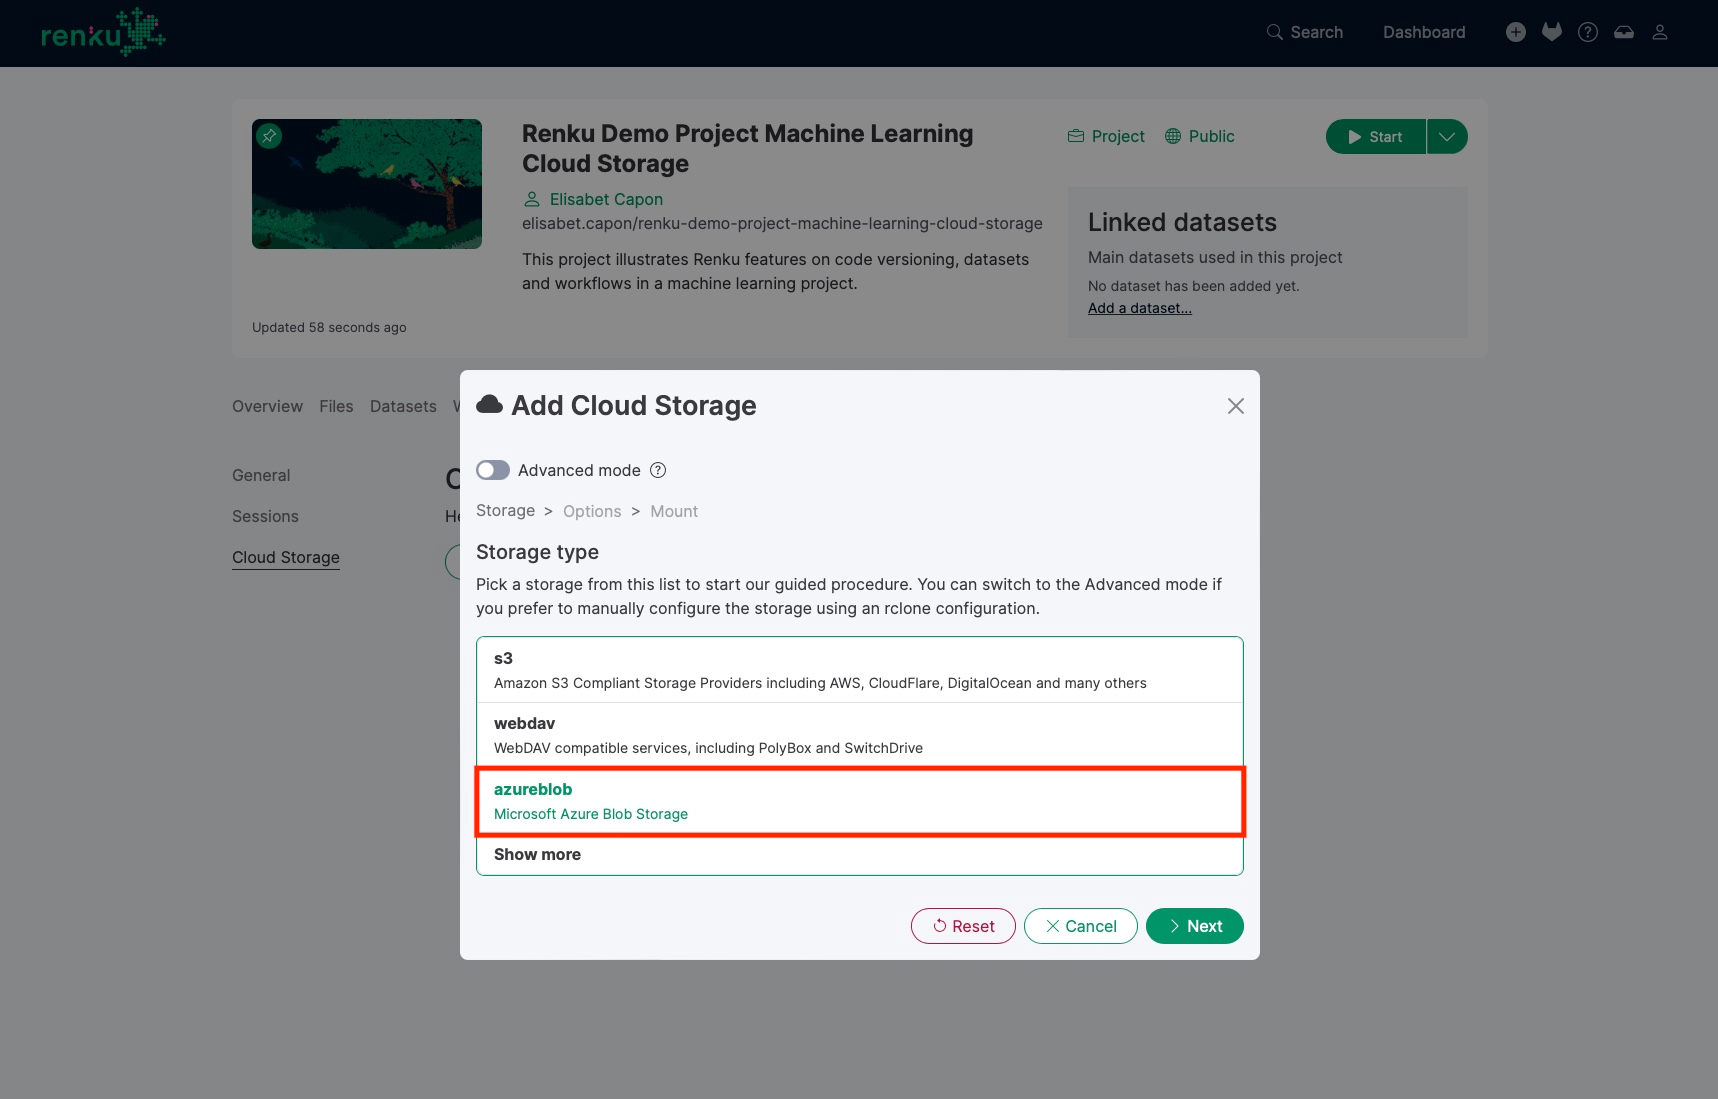
Fill in the form by filling the
Source pathto mount (keep it blank to mount the default root, or specify the folder) and the Account Name. Fill in theShared Key. Click on theNextbutton.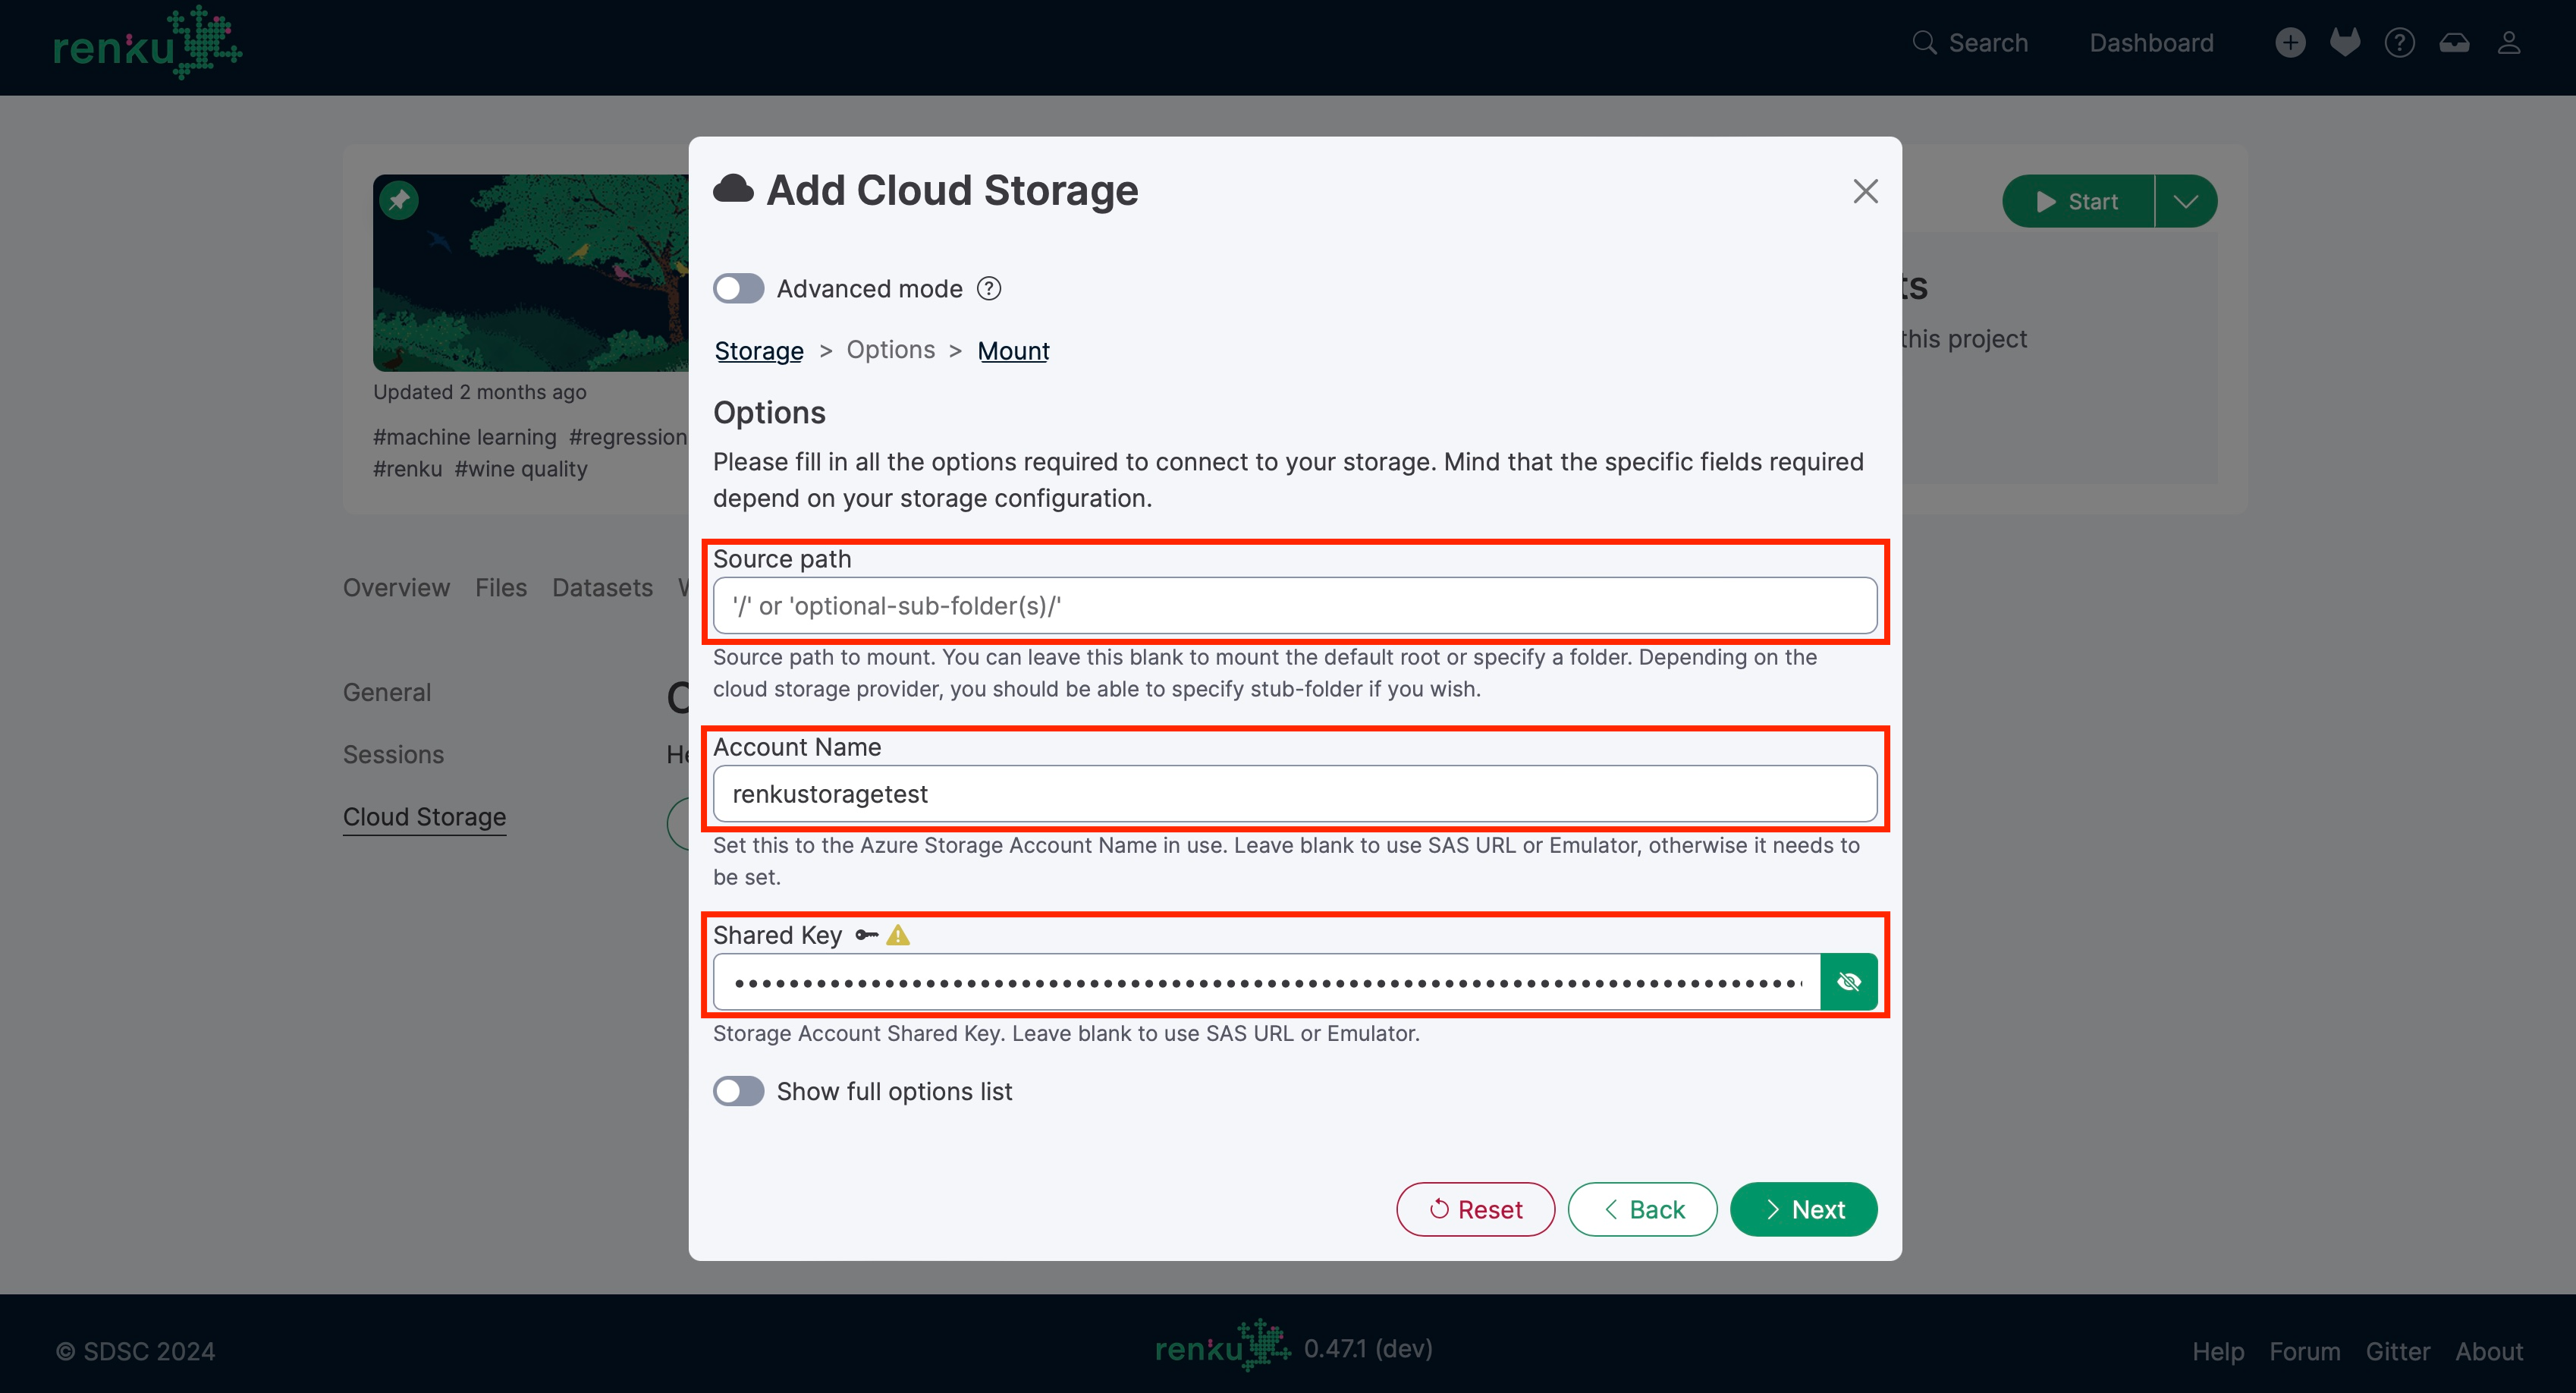
On the last page, pick any name for the storage (e.g: blob_storage`). You can change the
Mount pointtoo; that determines the virtual folder where this is mounted in the running sessions. Click on theAdd storagebutton.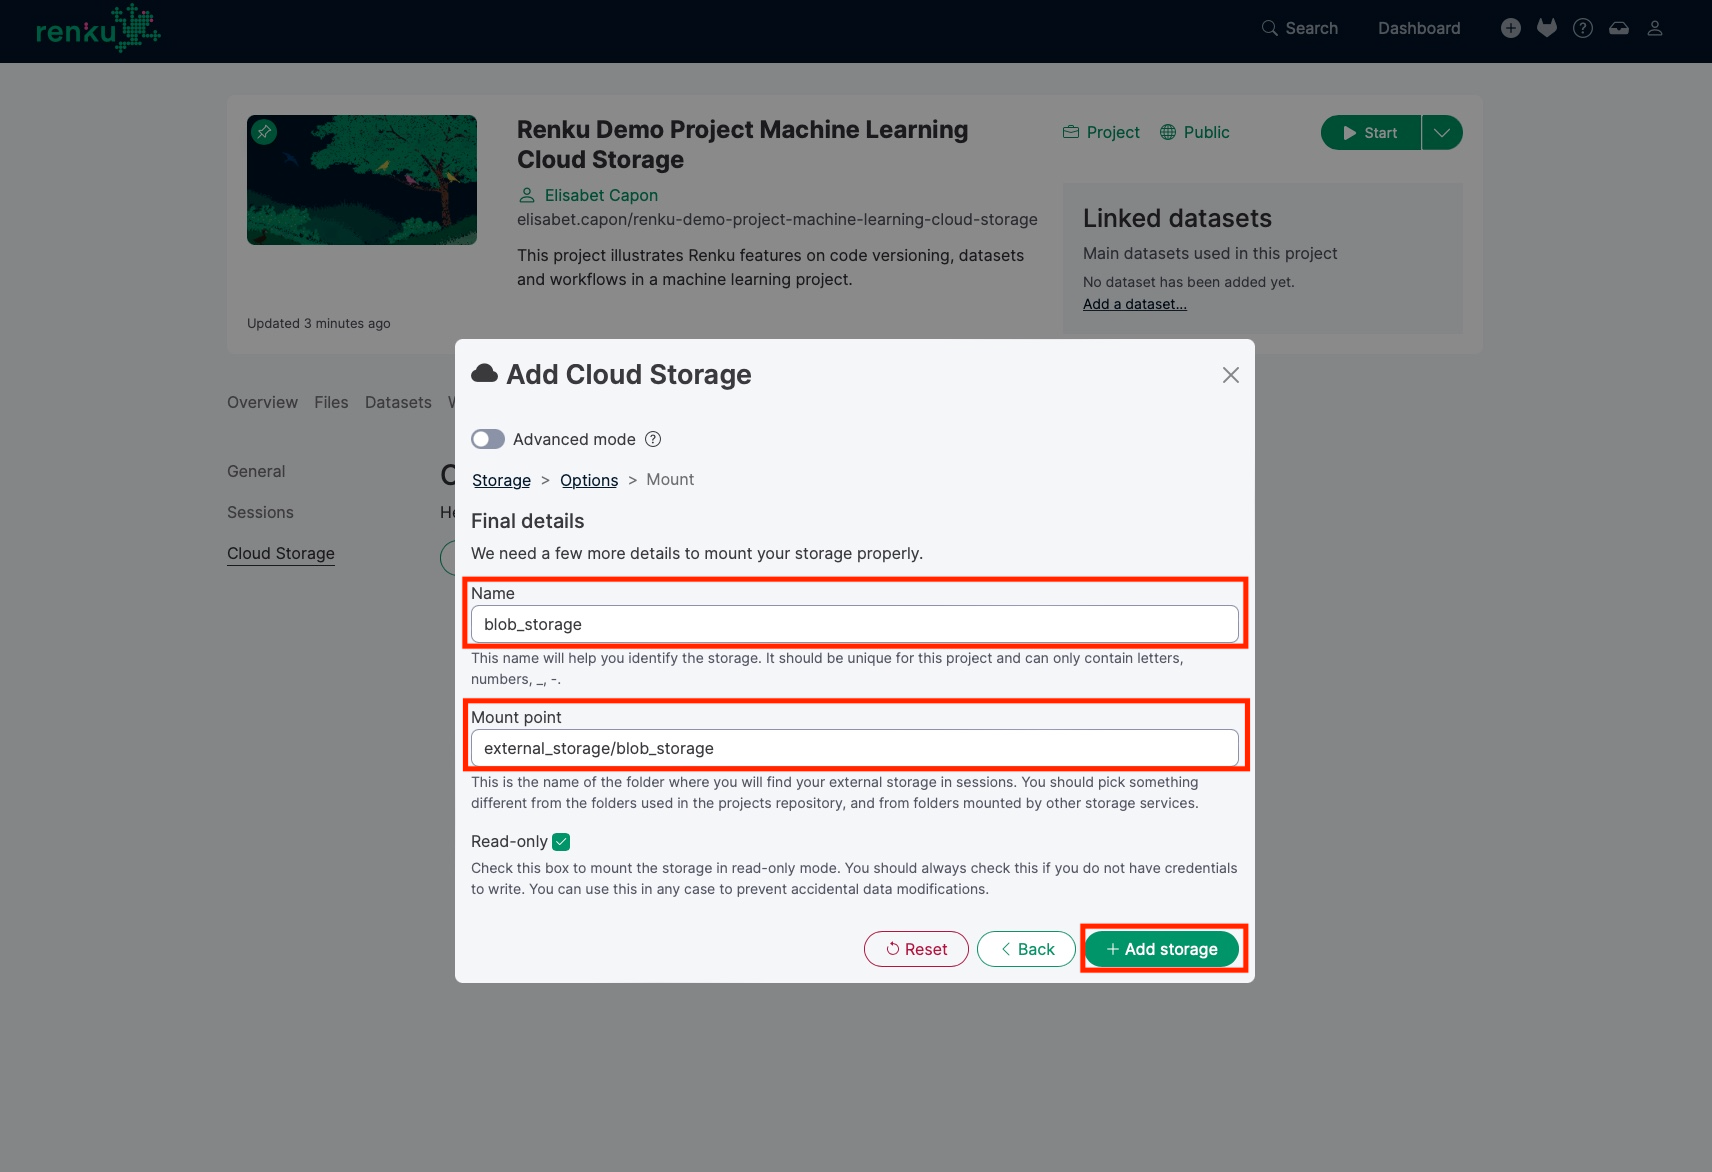
When you start your session, the blob storage will be available at the specified mount point.
WebDAV
Many storage services, offer access via the WebDAV protocol. Renku supports mounting WebDAV resources in interactive sessions.
Warning
We strongly encourage you to generate a token for accessing your private OwnCloud/Nextcloud WebDAV shares to avoid sharing your account password. To create the token, go to “Settings: Security” in your cloud storage application and generate a new “Application pass-code” at the bottom of the page.
Here we show an example of adding an ETH Polybox drive to the session, but the procedure will be similar for any storage accessible via WebDAV.
Navigate to
Settings - Cloud storagein your Renku project.Click on the “Add Cloud Storage” button and select
webdavfor the “Storage Type”. Click on the “Next” button at the bottom.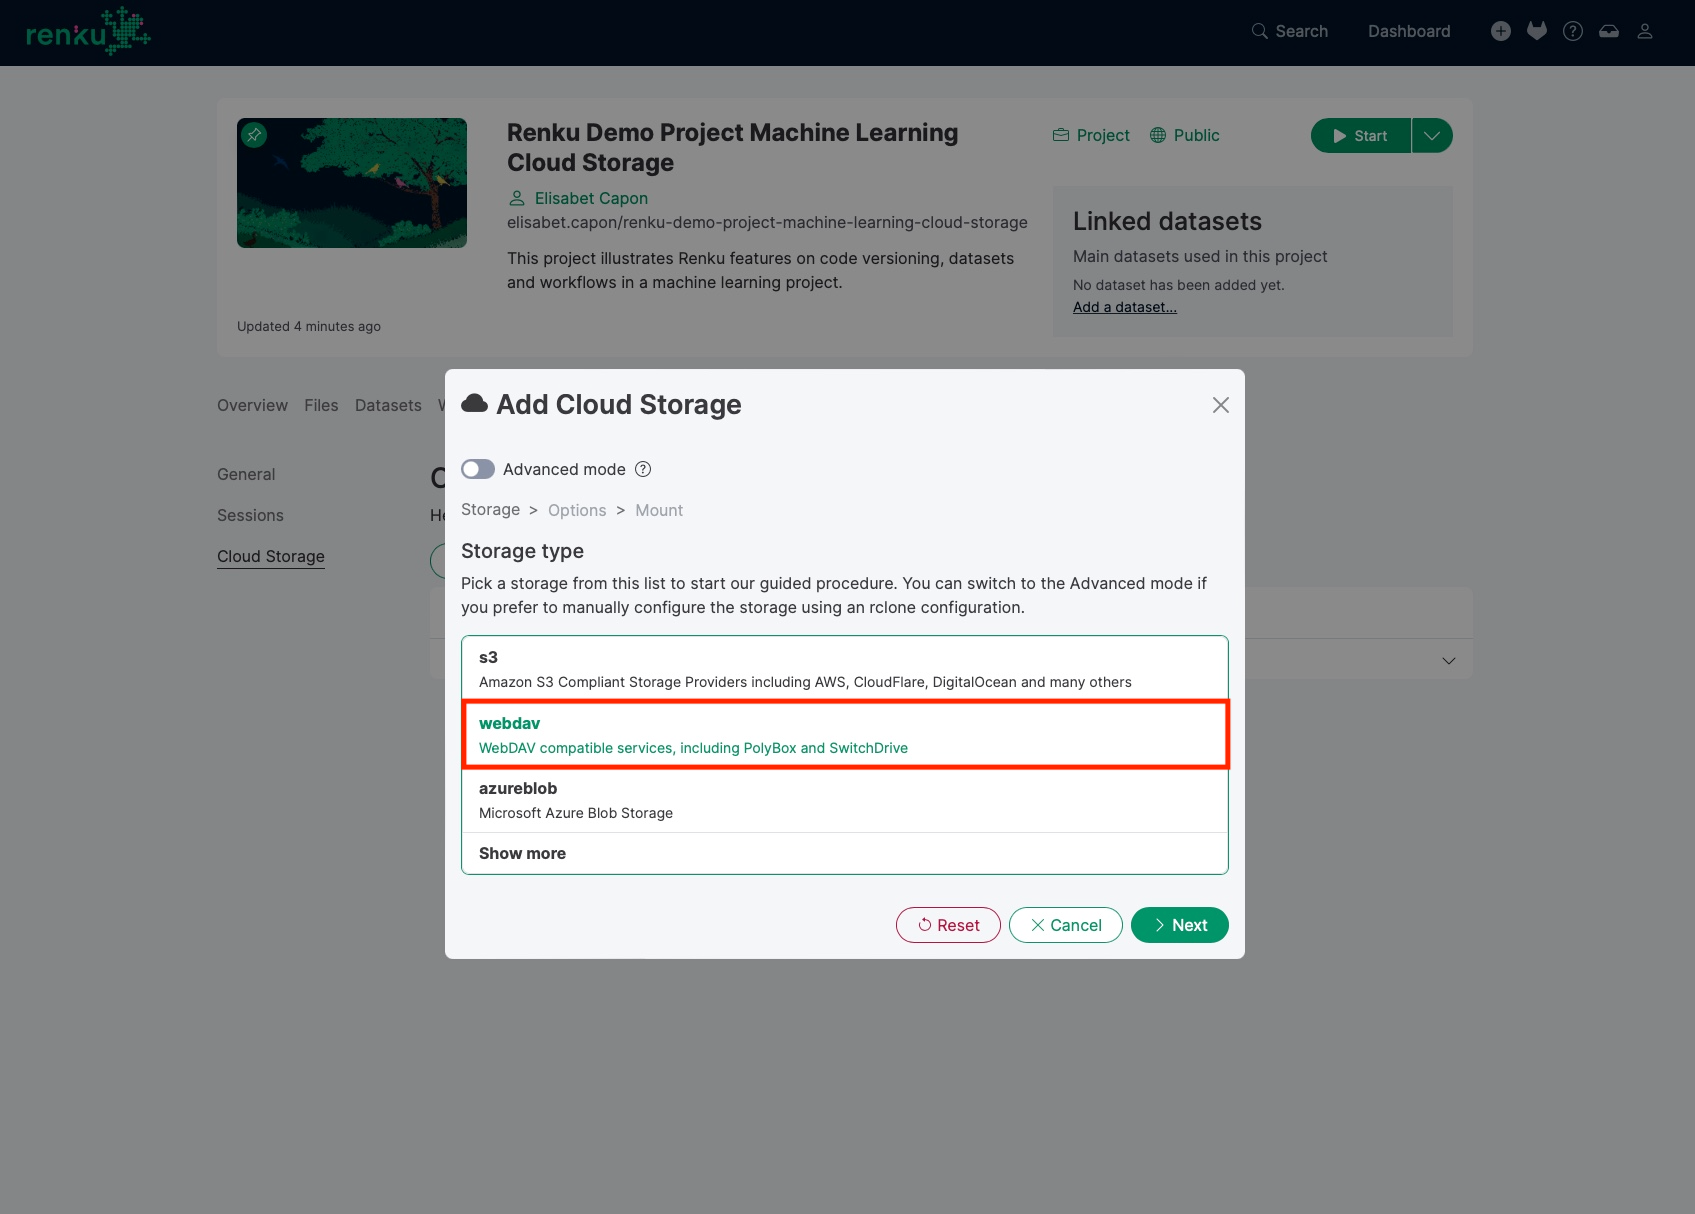
Fill in the form by providing the
Source pathto mount (keep it blank to mount the default root, or specify the folder), and the URL to specify the host to connect to (https://polybox.ethz.ch/remote.php/webdav/for ETH Polybox). Fill in theUsernameand theToken (or password). Click on the “Next” button.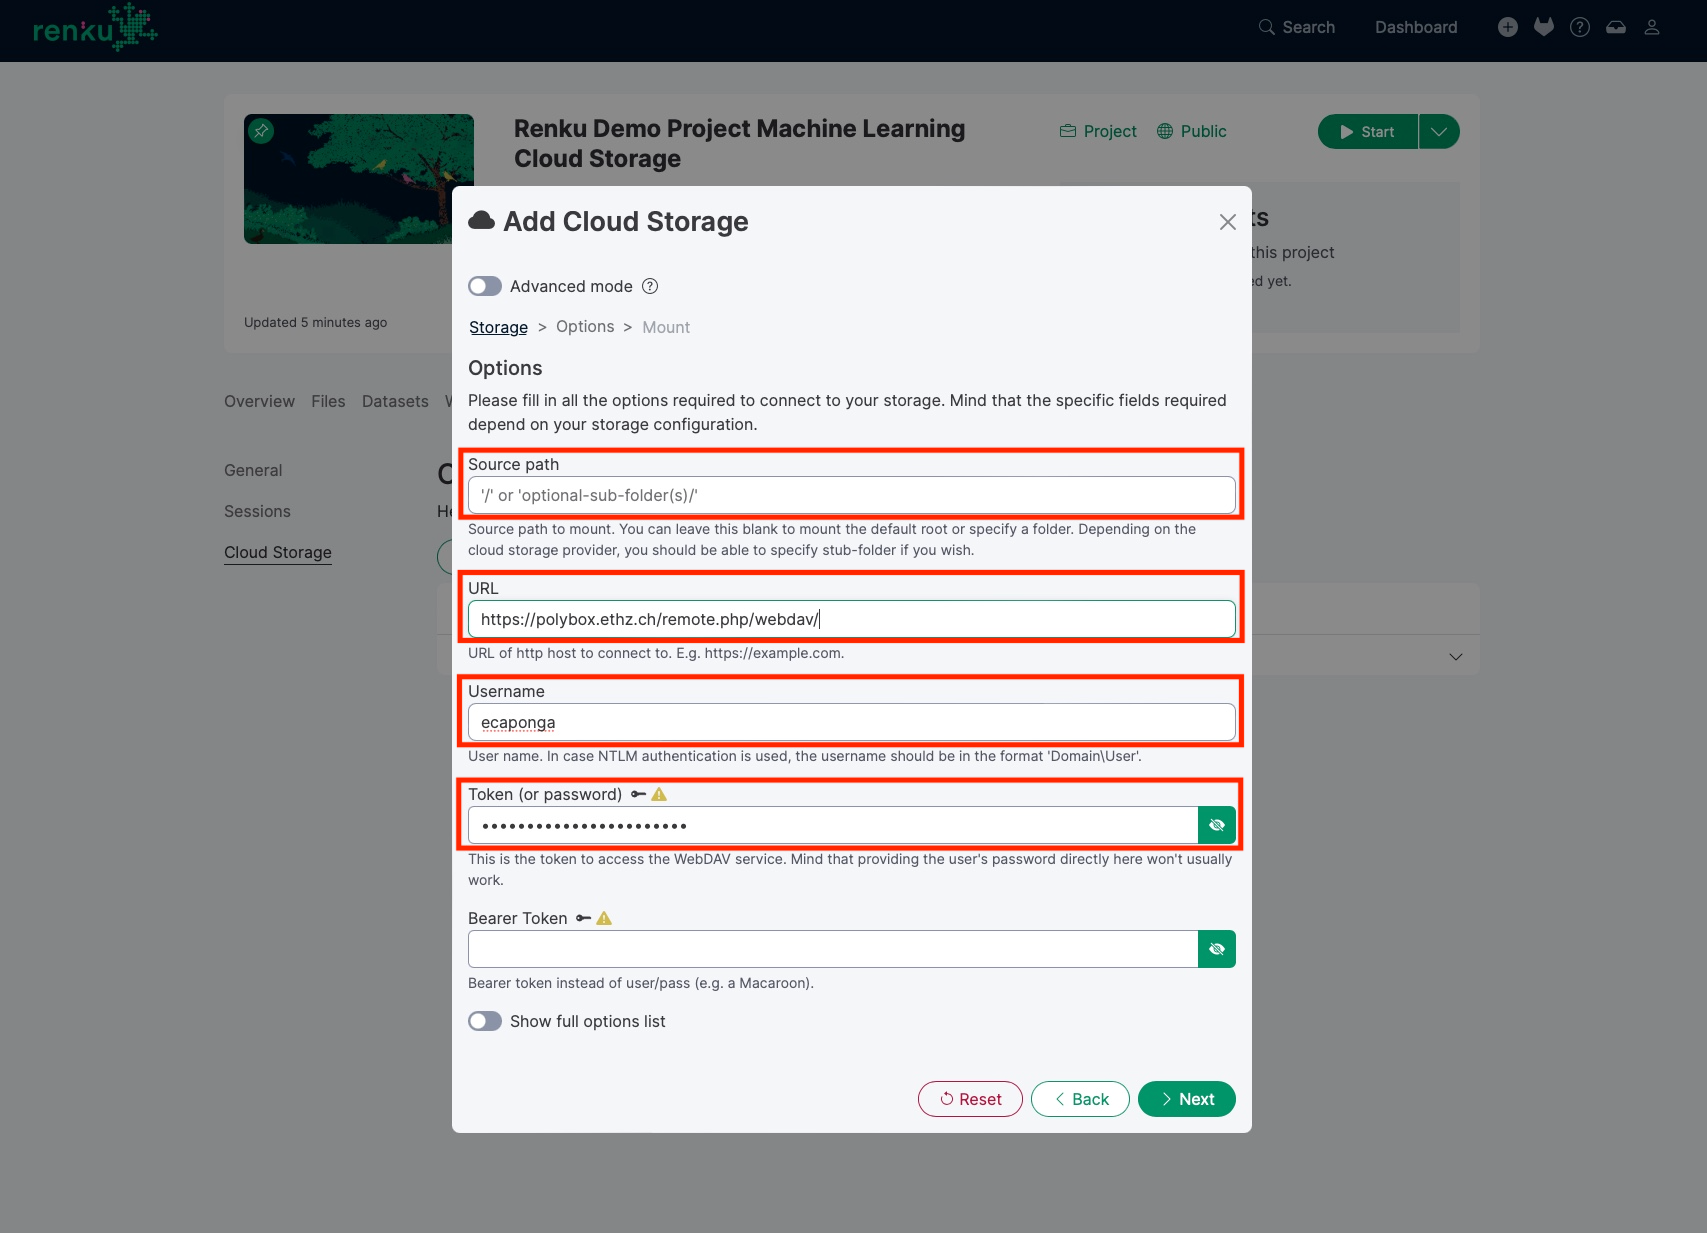
On the last page, pick any name for the storage (e.g:
webdab_storage). You can change theMount pointtoo; that determines the virtual folder where this is mounted in the running sessions. Click on the “Add storage” button.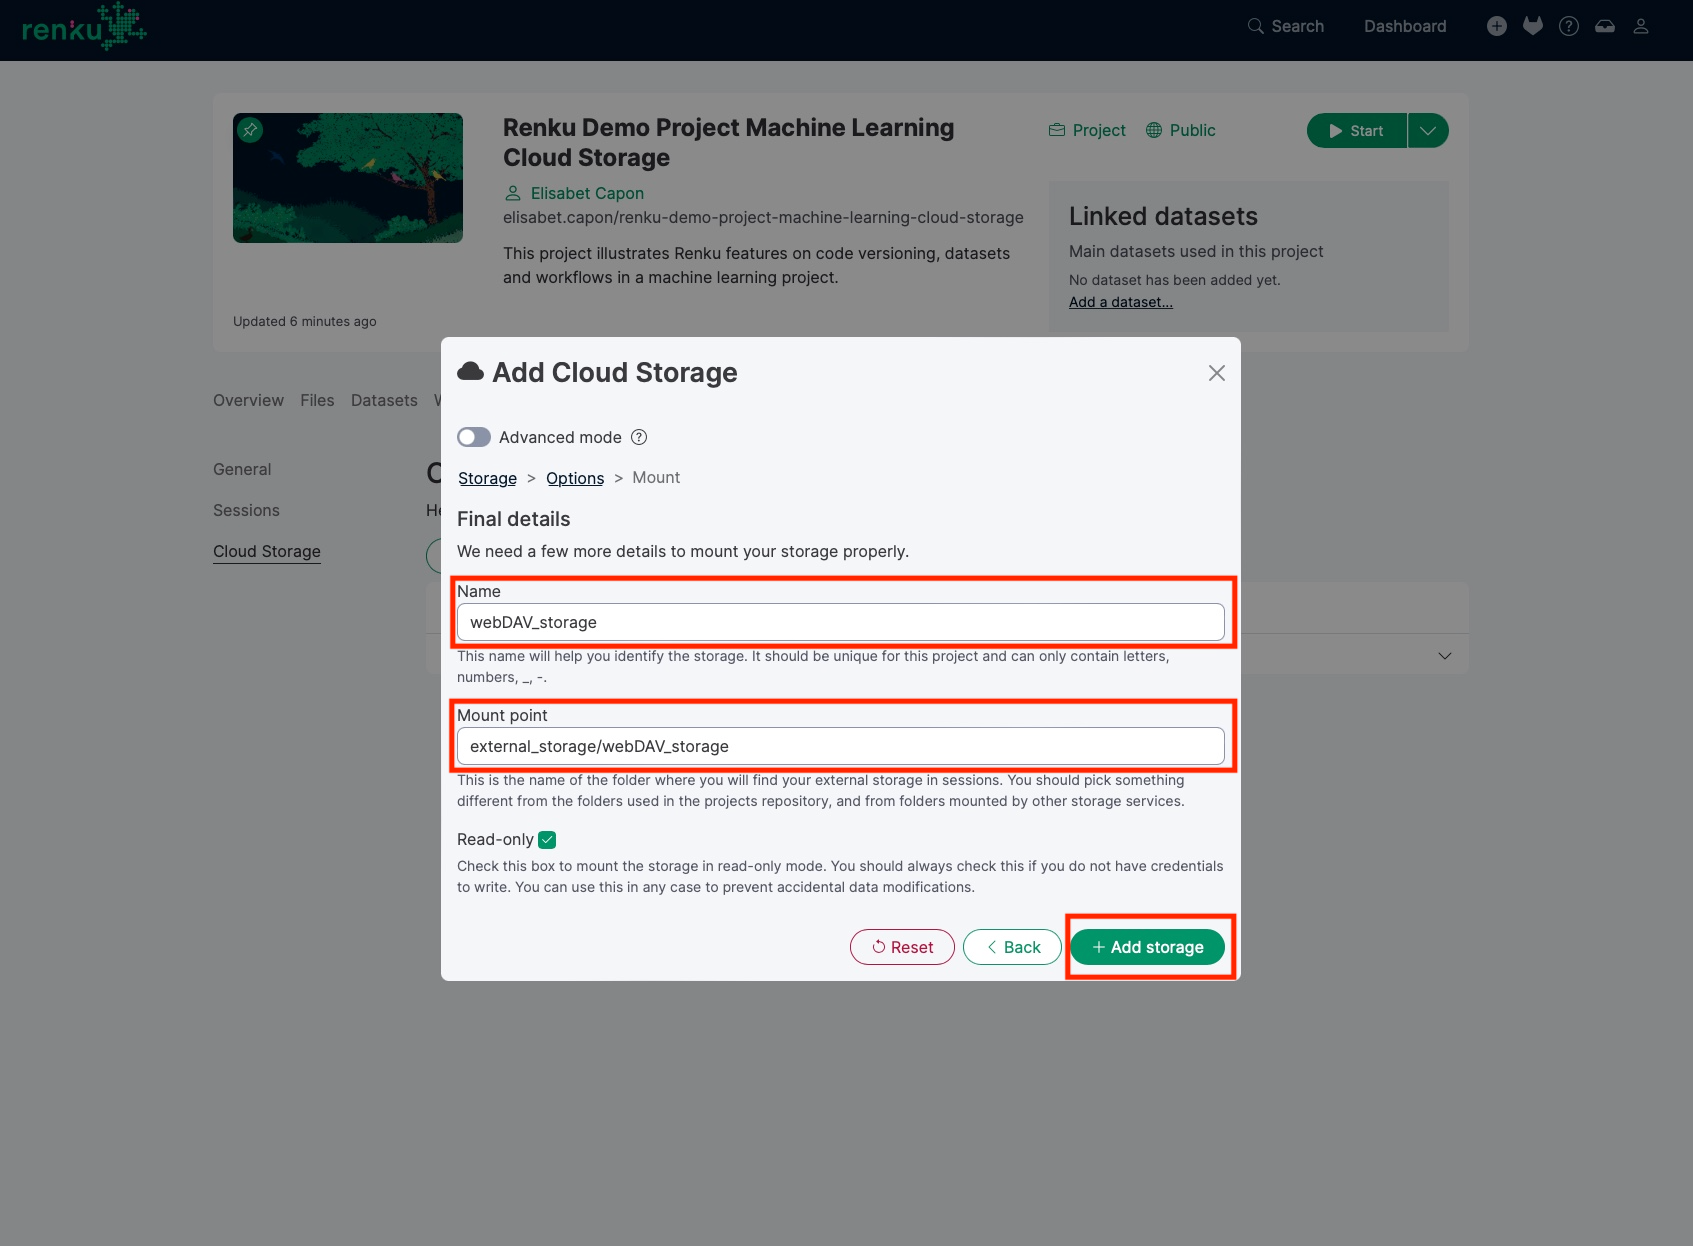
You will be able to access the cloud storage at the specified mount point within your session.
Credentials
For the time being, you cannot persist storage credentials in RenkuLab. If you need to provide credentials to access storage, you will be asked to provide them when starting a new session. The storage can be optionally disabled when launching a session, if you do not wish to use it or if you do not have the required credentials. If you pause and resume your session, you do not need to enter credentials again.
Performance
Performance varies based on the specific storage service, the access mode, and the available bandwidth. Consider caching data locally if large amounts of data need to be read or written repeatedly.