Session Basics
What is a Session?
Sessions on RenkuLab are web-based user interfaces (like JupyterLab and RStudio) that you can launch to develop and run your code and data workflows. They’re commonly used for exploratory analysis because you can try out short blocks of code before combining everything into a (reproducible) workflow.
You can run JupyterLab or RStudio within a project independently from RenkuLab, but RenkuLab offers the following advantages:
Environments hosted in the cloud with a configurable amount of resources (memory, CPU, and sometimes GPU).
Environments are defined using Docker, so they can be shared and reproducibly re-created.
Auto-saving of work back to RenkuLab, so you can recover when your environment is shut down (this happens automatically after 24 hours of inactivity).
A git client pre-configured with your credentials to easily push your changes back to the server.
The functionality provided by the renku-python command-line interface (CLI) is automatically available.
What’s in my Session?
Your project, which is cloned into the environment on startup.
Your data files (if the option
Automatically fetch LFS datais selected) that are stored in git LFS*.All the software required to launch the environment and common tools for working with code (
git,git LFS,vim, etc.).Any dependencies you specified via conda (
environment.yml), using language-specific dependency-management facilities (requirements.txt,install.R, etc.) or installed in theDockerfile. An exception to this is if project has a pinned Docker image.The renku command-line interface renku-python.
The amount of CPUs, memory, and (possibly) GPUs that you configured before launch.
For adding or changing software installed into your project’s session, check out Customizing sessions
Which Session will launch?
The template you choose when you create a project on RenkuLab (or locally call
renku init on your project) determines the kind of session
that is available to launch. Once it is initialized, your project can easily be
modified, for example to install additional libraries into the environment - see
Customizing sessions. We provide templates for basic Python, R, and Julia
projects. If you wish to use custom templates for your projects, you can build
your own! Please refer to the templating documentation.
Starting a new Session
You can start a session from RenkuLab in 3 different ways:
Click on the project quick start button. That’s available as a play icon on the project cards, both on the landing and search pages. Or on the top right of the project header on project pages. This action will automatically identify the most recent contribution on the default branch and start a new session there. Should anything be wrong (E.G. missing Docker images, running CI jobs, etc.), you will be redirected to the “Start with options” page. If a session is already running, you will see a “Connect” button instead of the “Start” button.
Click on the “Start with options” link in the “Start/Connect” dropdown menu available on the top right of the project page header. Or on the “New session” button on the project sessions tab. This action will bring you to a lengthy “Start Session” page with many more options to configure your session before starting.
Use an “Autostart Session” link. The user experience is very similar to the quick start button. You can easily generate and share links that start on the latest version of any branch or specify references and environmental variables to tailor the session to specific needs.
Start with options
When starting a new session through the “Start with options” button from the project page header or the “New session” button on the project sessions tab, you will be able to completely control the parameters for the session that will start. In general, the default values should work well. But there are situations where using the extended options are indispensable. Examples include:
Picking a non-default branch.
Increasing resource limits (processing power, memory, or disk space) if you know it is necessary or if the session crashes when starting or complains that there is not enough space.
Here’s the rundown of the configuration options.
Option |
Description |
|---|---|
Branch |
This is the default branch (typically |
Commit |
Typically the most recent commit, but could be different if there is a running session or uncommitted work from a recent session. Selecting a different commit can be useful to see the state of the project at a specific point in time, to avoid a commit in which the image does not build, or to ignore autosaved work. |
Docker Image |
This provides information about the Docker image used by the Session. When it fails, you can try to rebuild it, or you can check the GitLab job logs. An image can also be pinned so that new commits will not require a new image each time. |
Default environment |
Default is |
Number of CPUs |
The number of CPUs available, or the quota. Resources are shared, so please select the lowest amount that will work for your use case. Usually, the default value works well. |
Amount of Memory |
The amount of RAM available. Resources are shared, so please select the lowest amount that will work for your use case. Usually, the default value works well. |
Number of GPUs |
The number of GPUs available. If you can’t select any number, no GPUs are available in RenkuLab deployment you are using. If you request any, you might need to wait for GPUs to free up in order to be able to launch an environment. |
Automatically fetch LFS data |
Default is off. All the lfs data will be automatically fetched in if turned on. This is convenient, but it may considerably slow down the start time if the project contains a lot of data. Refer to Data in Renku for further information |
Create autostart links
Autostart links are a good way to give others access to sessions, since they bring the visitor directly into a session without having to search for projects or provide any information. The standard behavior is for the autostart link to use the default branch on the target project; if any session is already running, the user is taken there there. Otherwise, a session is started either from the previously unsaved work (if any) or the latest commit.
You can customize this behavior to match specific needs.
To create an autostart link from a RenkuLab deployment, you can open a project, go to the “Start session with options” page, and click on the dropdown menu on the Start session button on the bottom right, and select the Create link option.
A modal will open where you can change some default values and copy the URL as text or markdown.
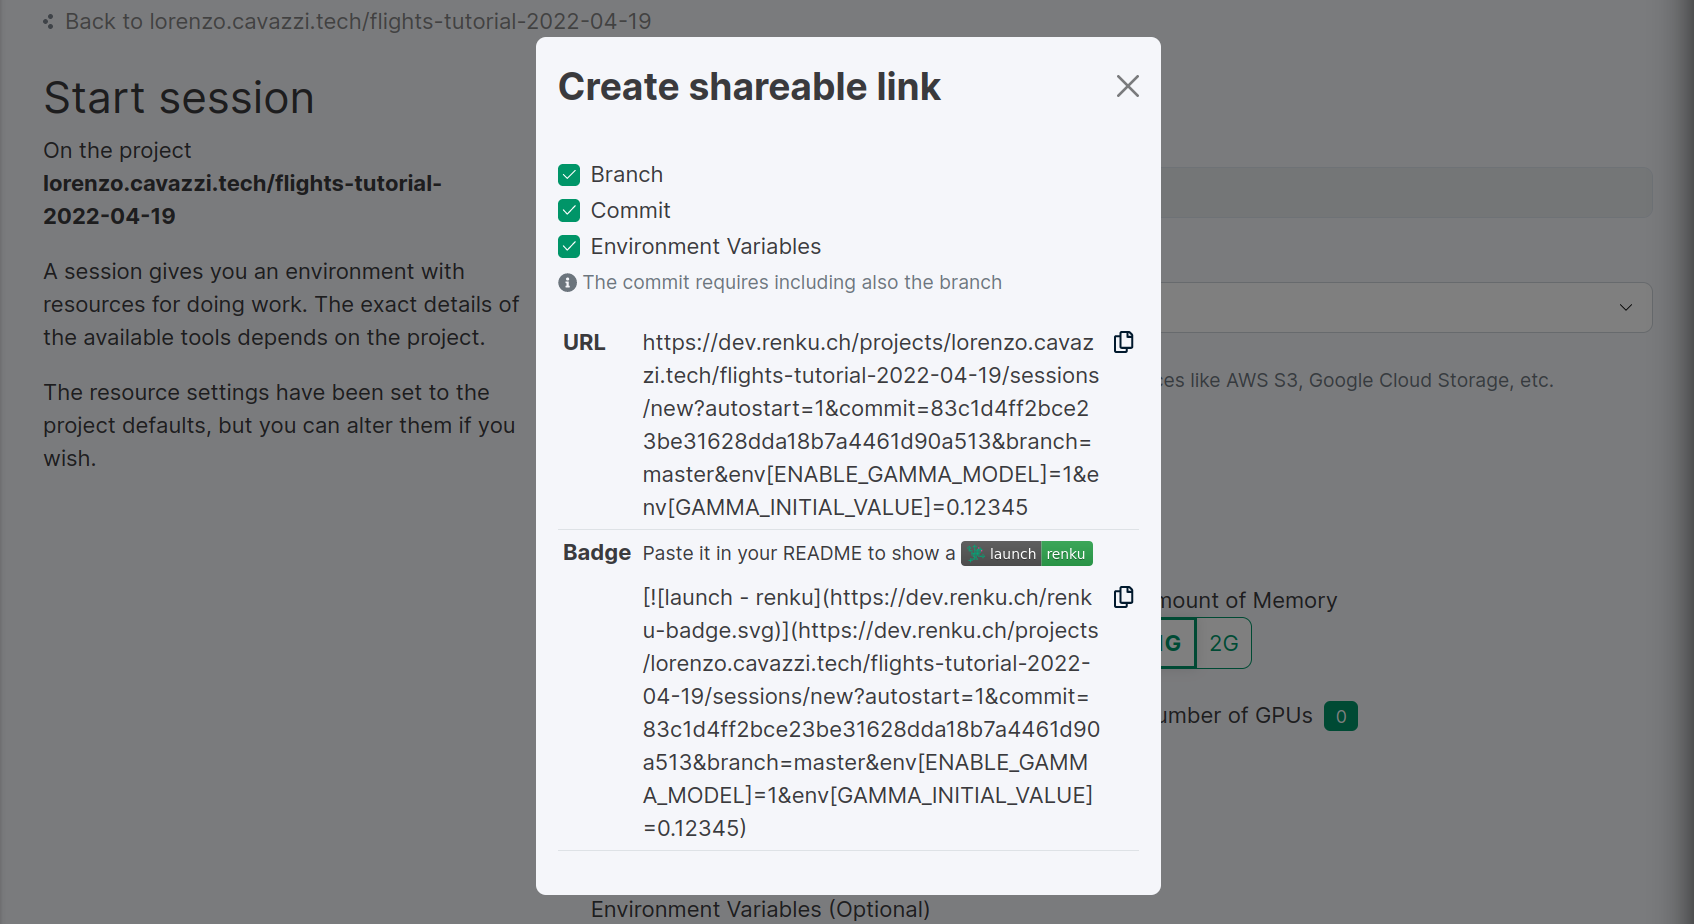
Autostart links can be configured to refer to a specific branch and/or commit, and can specify environment variables. Mind that the configuration can affect the starting flow.
Set a branch: the default sequence is followed, but the target branch will be used instead of the project default. This is useful when working on different branches to prevent accidentally starting sessions on the default branch.
Set a commit: in this case, the session is started from the target commit. Running sessions on other commits are ignored, and any unsaved work previously done on different commits is deleted. This is useful for sharing a specific version of an application with third parties (E.G. when publishing results on a paper, sharing a working application, etc.). Mind that contributing to the project might be tricky when starting from a specific commit since it might not point to the HEAD of any branch.
Set environment variables: if you frequently need to set environment variables for your sessions, this might spare you time; you can embed those variables and their values in an autostart link. Mind that storing secrets or sensitive values in the URL is not a good idea.
Programmatically compute autostart links
Generating autostart links from the RenkuLab interface is the simplest option. You can follow these guidelines to set the query parameters correctly if you need to create links programmatically or manually.
The default autostart URL has the following structure: https://renkulab.io/projects/<namespace>/<project>/sessions/new?autostart=1
You can add the following:
branch: &branch=<branch-name>
commit: &commit=<full-commit-sha>. Mind that the commit will only work if you also specify a branch.
environment variables: for each variable &env[<variable-name>]=<variable-value>
What if the Docker image is not available?
Sessions are backed by Docker images. When launching a new session, a container is created
from the image that matches the selected branch and commit, or
the pinned image if the project’s settings specify any.
A GitLab’s CI/CD pipeline automatically builds a new image using the project’s
Dockerfile when any of the following happens:
Creating of a project.
Forking a project (in which the new build happens for the fork).
Pushing changes to the project.
The pipeline is defined in the project’s .gitlab-ci.yml file. If the project’s settings include a pinned image, there is no need to run the image_build job. The image needs to be accessible anyway to the user. This may not be the case if it is set private.
It may take a long time to build an image for various reasons, but if you’ve just created the project on RenkuLab from one of the templates, it generally takes less than a minute or two.
The Docker image is still building
If the Docker image has a “still building” message, you can either wait patiently,
or watch it build by clicking the associated link to see the streaming log messages
on GitLab. This can be useful if you’ve made changes to the Dockerfile or added
lines to requirements.txt, environment.yml, or install.R, where something
might have gone wrong.
The Docker image build failed
If this happens, it’s best to click the link to view the logs on GitLab so you can see what happened. Here are some common reasons for build failure:
Software installation failure
Problem: You added a new software library to requirements.txt, environment.yml,
or install.R, but something was wrong with the installation (e.g. typo in
the name, extra dependencies required for the library but unavailable).
How to fix this:
You can use the GitLab editor or clone your project locally to fix the installation,
possibly by adding the extra dependencies it asks for into the Dockerfile
(the commented out section in the file explains how to do this). As an alternative,
you can start a session from an earlier commit.
How to avoid this: First try installing into your running session,
e.g. by running pip install -r requirements.txt in the terminal on JupyterLab.
You might not have needed to install extra dependencies when installing on your
local machine, but the operating system (OS) defined in the Dockerfile has
minimal dependencies to keep it lightweight.
The build timed out
By default, image builds are configured to time out after an hour. If your build takes longer than that, you might want to check out the section on Customizing sessions sessions before increasing the timeout.
Your project could not be cloned
If you accidentally added 100s of MBs or GBs of data to your repo and didn’t specify that it should be stored in git LFS, it might take too long to clone. In this case, read the docs on how to rewrite history and move these files into git LFS.
Another potential cause is if the project has submodules that are private.
The Docker image is not available
RenkuLab uses its internal instance of GitLab to build and store an image in the registry each time you create a project, push changes, or use the RenkuLab UI to fork a project. Thus, the image might be unavailable if you manage to get into a state that skips any of these steps.
On forked projects, images for old commits are typically unavailable. It may be a problem when working on non-default branches too. When RenkuLab detects the image is missing, it will guide you to fix the problem (given you have enough permissions to run pipelines for the project). This works well for the latest commit in any branch, but it may be trickier for older commits.
As a workaround, the easiest way to trigger a new image build would be adding a
new trivial commit through the GitLab instance, like editing the README.md
file.